
Are you ready to upgrade your thermostat to something that learns, saves, and helps keep every room comfortable without you having to micromanage it?
 + Nest Temperature Sensor (2nd gen) - Obsidian here.")
Quick verdict
You’ll find the Google Nest Learning Thermostat (4th gen) with the Nest Temperature Sensor (2nd gen) — Obsidian — to be an attractive and capable smart thermostat that focuses on automated comfort and energy savings. It’s packed with features that reduce hands-on scheduling, gives you remote control through the Google Home app, and pairs with the separate temperature sensor to help manage hot and cold spots in your home.

Google Nest Learning Thermostat (4th gen) + Nest Temperature Sensor (2nd gen) - Obsidian
$254.99 In Stock
What’s in the box?
You get the Nest Learning Thermostat (4th gen) and one Nest Temperature Sensor (2nd gen) with standard packaging that includes the trim plate, mounting screws, and a basic installation guide. You’ll also find the quick start instructions to help you use the Google Home app to set everything up and connect to Wi‑Fi.
Design and build quality
The 4th gen Nest keeps the classic Nest aesthetic: a circular, angular ring with a high-quality finish and a large, bright display. The Obsidian color gives the thermostat a modern, minimalist look that tends to blend well with most interior styles while feeling premium to the touch.
Display and Dynamic Farsight
The display is about 60% larger than earlier Nest displays, making text and icons easier to read from across the room. Dynamic Farsight senses when you’re in the room and shows useful information like the current temperature, the time, or weather, and you can choose the style you prefer in the app.
Finish and physical controls
You control the thermostat by turning the outer ring and tapping the screen, which remains a tactile and satisfying interaction compared with purely touch-based devices. The auto-brightness adjusts depending on room lighting, but you can set brightness manually if you prefer a fixed setting.
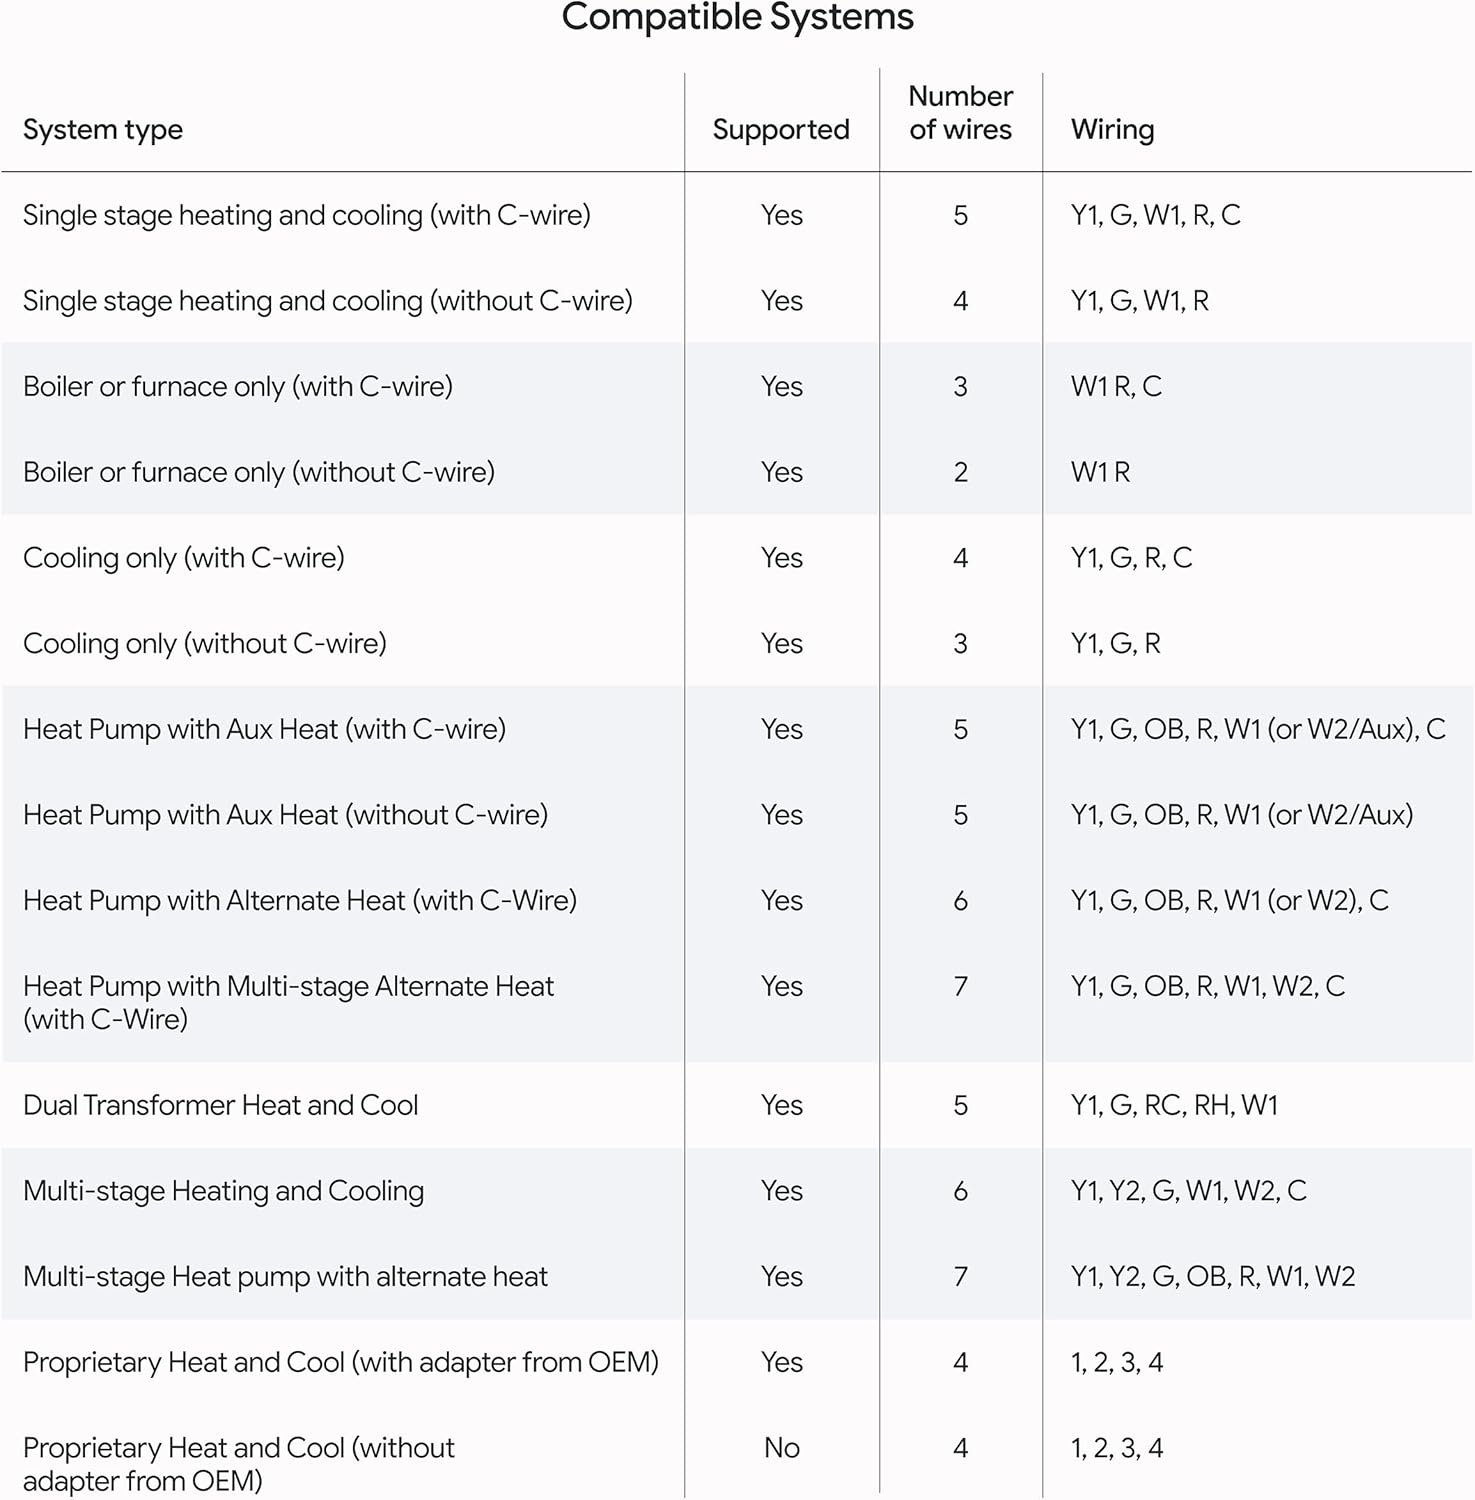
Compatibility and installation
The Nest Learning Thermostat (4th gen) is designed to work with most 24V systems including gas, electric, oil, forced air, heat pump, and radiant systems. In many homes, you won’t need a C-wire for installation, but you should check the Nest Compatibility Checker before starting if you have an unusual HVAC setup.
Wiring and C‑wire considerations
If your furnace or air handler lacks a common (C) wire, Nest typically uses power-sharing methods to stay charged, and most installations won’t require running a new wire. However, some HVAC systems—especially those with certain heat pumps or multi-stage equipment—may still require a C-wire or a compatible adapter; checking compatibility in advance prevents surprises.
Matter and smart home integration
The thermostat is Matter compatible, making it easier to include in your broader smart home ecosystem and to standardize device control across platforms. It also works with Google Assistant, Alexa, and Siri via supported integrations, so you can use voice commands from devices you already own.
 + Nest Temperature Sensor (2nd gen) - Obsidian.")
Setup and Google Home app experience
You’ll perform most of the setup in the Google Home app, which guides you through wiring verification, connecting to Wi‑Fi, and adding the Nest Temperature Sensor to your system. Once installed, the app gives you remote control, scheduling tweaks, and notifications about recommended schedule changes to save energy.
Guided installation and troubleshooting
The guided setup walks you through how to mount the thermostat, match wires to terminals, and complete initial configuration without major technical knowledge. If something goes wrong, the app includes troubleshooting steps and can provide error messages that help you or an installer pinpoint issues.
Using voice assistants and remote control
You can ask your voice assistant to adjust the temperature, change modes, or report the current temperature and humidity. The combination of remote access and voice control means you don’t have to be near the thermostat to change settings, which is great when you’re away or want to adjust the climate without getting up.
Nest Temperature Sensor (2nd gen)
The Nest Temperature Sensor lets you set a target temperature for a specific room at a specific time of day, so your thermostat can prioritize that location over the thermostat’s built‑in sensor. This is especially useful if the thermostat is placed in a hallway or another area that doesn’t reflect conditions in frequently used rooms.
How sensors handle hot and cold spots
You place the sensor where you need more accurate control — for example, in a bedroom that runs cooler than the living room — and then assign that sensor to an assigned schedule or time slot in the app. The Nest thermostat will use that sensor’s readings during the assigned time to drive the HVAC, helping smooth out hot and cold spots.
Placement recommendations
Place the sensor on an interior wall, away from direct sunlight, drafts, or heat sources like vents and lamps to get the most accurate readings. You can have multiple sensors and rotate them or assign them to different schedules as your needs change through the day.
Energy saving features and performance
The Nest Learning Thermostat aims to save energy primarily through learning your routine, making informed schedule suggestions, and using outside temperature data to pause systems when the house is naturally warming or cooling. Google reports average savings of about 12% on heating and 15% on cooling bills when using a Nest thermostat; your mileage will vary depending on local climate, your existing insulation, and your habits.
Learning, suggestions, and Adaptive Eco
The thermostat learns how you schedule temperature changes and begins making automatic adjustments over time, which cuts down on constant manual changes. New Adaptive Eco uses outside temperature to find an energy-saving target when you’re away and returns to comfort within an hour of your return, attempting to avoid big energy penalties while maintaining comfort.
Natural heating and cooling
The thermostat can learn how external conditions like sunshine through windows affect indoor temperature and temporarily pause heating or cooling to take advantage of that natural effect. That feature works well in homes with strong solar gain or where outdoor conditions often help maintain comfortable indoor temperatures.
Real‑world savings and expectations
You should expect the thermostat to help you reduce energy consumption when you allow it to learn your schedule and accept energy-saving schedule changes. If you manually override the thermostat frequently or keep tight comfort bands, your savings may be lower than the averages mentioned.
 + Nest Temperature Sensor (2nd gen) - Obsidian")
Technical breakdown and specifications
Below is a table to help you quickly reference the most important features and compatibility notes for this Nest bundle.
| Feature | Details |
|---|---|
| Model | Google Nest Learning Thermostat (4th gen) + Nest Temperature Sensor (2nd gen) |
| Color/Finish | Obsidian |
| Display | 60% larger display than prior Nest models; Dynamic Farsight shows time, temperature, or weather |
| Compatibility | Works with most 24V systems (gas, electric, oil, forced air, heat pump, radiant); check Nest Compatibility Checker |
| C‑wire | No C‑wire required for installation in most homes (compatibility checker recommended) |
| Smart Home | Matter compatible; works with Google Assistant, Amazon Alexa, Siri through platform integrations |
| Remote control | Google Home app for iOS and Android |
| Included sensor | Nest Temperature Sensor (2nd gen) included; works with additional Nest sensors |
| Energy savings | Reported averages: ~12% heating, ~15% cooling (actual savings will vary) |
| Key features | Learning schedules, Adaptive Eco, Natural heating & cooling, Dynamic Farsight, schedule suggestions |
| Installation | Typically DIY-friendly with in-app guidance; professional install optional |
| Notifications | Energy-saving change suggestions and system notifications via Google Home app |
Performance, reliability, and software updates
You’ll benefit from Google’s regular firmware updates and improvements that add features or refine existing behavior over time. The thermostat generally performs reliably, but like all smart devices, it can occasionally require reboots or firmware updates to resolve glitches.
Lifespan and durability
The thermostat’s hardware feels sturdy and built to last typical consumer lifetimes for smart home devices, though expected longevity depends on usage patterns and HVAC system interactions. Software support and continued ecosystem integration are key benefits that can extend useful lifetime by keeping features current.
Connectivity and failover behavior
If your Wi‑Fi drops temporarily, the thermostat still controls your HVAC with its local intelligence and schedule. You’ll lose remote control and some cloud-dependent features until connectivity is restored, but core temperature control remains functional.
Pros and cons
You’ll want to weigh both strengths and weaknesses before committing to this thermostat.
Pros:
- Attractive, high-visibility display with Dynamic Farsight that’s easy to read across the room.
- Learns your schedule and suggests energy-saving changes you can accept with a tap.
- No C‑wire required in many installations and designed to work with most 24V systems.
- Matter compatibility and broad voice assistant support for integration into your smart home.
- Includes Nest Temperature Sensor to address hot and cold spots.
Cons:
- True savings depend heavily on your home, local climate, and how much you accept automated schedule changes.
- Some complex HVAC systems may still require a C‑wire or professional installation.
- The more advanced features rely on cloud connectivity; limited functionality while offline.
- If you’re highly privacy-sensitive, you’ll need to evaluate how Google manages usage data.
Who should buy this
You should consider this thermostat if you want a low‑maintenance smart thermostat that learns, integrates with a wider Google smart home setup, and can address room-specific temperature needs with additional sensors. It’s well-suited for owners who value automated energy savings and remote control.
 + Nest Temperature Sensor (2nd gen) - Obsidian")
Who might want something else
You may want to look elsewhere if you prefer a simpler programmable thermostat without cloud connectivity, need ultra-deep local controls for professional HVAC setups, or want to avoid Google ecosystem integrations for privacy reasons. Additionally, if your home uses an uncommon HVAC configuration, a different model with explicit support for that setup might be safer.
Setup timeline and tips
Expect the entire DIY setup — unboxing, wiring, mounting, and app configuration — to take about 30–60 minutes if your wiring is straightforward. If you run into wiring complications or discover non‑standard equipment, allow additional time or plan for a professional HVAC technician.
Tips:
- Use the compatibility checker before you begin to confirm terminal mappings and C‑wire expectations.
- Take a photo of your existing thermostat wiring before disconnecting wires; it helps when matching to Nest terminals.
- Keep firmware updated and grant necessary permissions in the Google Home app for full functionality.
- If you add multiple sensors, name them clearly in the app to avoid confusion when assigning schedules.
Troubleshooting common issues
If the Nest shows wiring errors or doesn’t power on, first check that the furnace switch is on and that the wiring matches the app’s guidance. For odd behavior like frequent reboots or cloud sync problems, try restarting the thermostat from its settings and confirm your Wi‑Fi credentials.
More specific issues and fixes:
- If the thermostat won’t charge and you don’t have a C‑wire, consider a C‑wire adapter or a pro install if power sharing isn’t functioning with your HVAC.
- If a Nest Temperature Sensor is not reporting, replace its battery and ensure it’s within range of the thermostat and not blocked by heavy metal surfaces.
- For persistent app errors, remove and re-add the device in Google Home only after ensuring the thermostat is reachable locally; factory reset is a last resort.
Privacy and data considerations
You’ll want to review Google’s privacy controls and the Google Home app settings to manage how usage and occupancy data are processed. Nest devices report energy-saving suggestions and usage patterns to your Google account to enable learning and suggestions, so you should understand what data is stored and how it’s used in the Google ecosystem.
What you can control
You can control notification preferences, disable certain connected features, and review account-level privacy settings to limit data sharing where supported. If data residency or third-party access concerns you, check Google’s published policies and available privacy controls before committing.
Comparison with previous Nest models and competitors
Compared with earlier Nest Learning Thermostats, the 4th gen brings a larger display, Dynamic Farsight, and enhanced learning features like Adaptive Eco and improved natural heating/cooling handling. Against competitors, it stands out for its polished design, robust learning features, and ecosystem integration, though some rivals may offer lower cost, different privacy tradeoffs, or specialized HVAC compatibility.
How it stacks up feature-wise
If you favor a thermostat that’s visually attractive and offers strong app-driven automation, the Nest is a top contender. If you need the absolute lowest price or prefer open-source/local-first smart home devices, other options might better suit your priorities.
Accessories and expansion
You can add extra Nest Temperature Sensors to better control specific rooms and use smart vents or zoned HVAC in more advanced setups to maximize comfort. If you expand to a full Google smart home, the thermostat integrates cleanly with routines and other Nest devices for synchronized behaviors.
Installation cost and professional help
While many people can install the Nest on their own, you might choose a pro if your system has multiple stages, dual fuel, or complex control wiring. Professional installation adds cost but reduces the chance of wiring mistakes and can ensure compatibility with existing HVAC safety systems.
Maintenance and long-term care
You’ll need very little maintenance beyond occasional cleaning and updating software via the Google Home app. Replace batteries in the Nest Temperature Sensor as needed and periodically check that the thermostat’s firmware is up to date to receive the latest features and bug fixes.
Final thoughts
If you want a smart thermostat that balances attractive design, learned automation, and smart-home compatibility, the Google Nest Learning Thermostat (4th gen) with the Nest Temperature Sensor (2nd gen) in Obsidian is a strong choice. You’ll appreciate the larger display, sensor support for hot and cold spots, and the energy-saving features that work quietly in the background.
Legal and disclaimers
Please refer to the “Legal” section below for all applicable legal disclaimers denoted by the bracketed numbers in the preceding bullet points (e.g., [1], [2], etc.).
 + Nest Temperature Sensor (2nd gen) - Obsidian.")
Disclosure: As an Amazon Associate, I earn from qualifying purchases.