
Thinking about whether the “Gate Opener Kit, Universal 24VDC Board for Automatic Double Arms Swing Gate Opener Control Board Panel Smart Control Center System for Driveway Home(Kit2)” will meet your needs?
")
Buy Gate Opener Kit 24VDC Double Arms On Amazon
Overview and first impressions
You’ll find that this kit centers on a universal 24V DC control board designed to run two motors for double-arm swing gates. The control board aims to be a smart control center for residential driveway applications, supporting both electromechanical and hydraulic drives. From a practical standpoint, it looks like a compact, flexible solution if you want programmable behaviors, safety integration, and remote operation options.
Who this product is for
If you’re installing or upgrading a two-leaf swing gate at home, and you want programmable timing, obstacle detection, and safety contact logic, this kit will likely fit your requirements. You’ll especially appreciate it if you plan to integrate multiple input types (pushbuttons, pedestrian inputs, safety photocells, and radio receivers) and you want to tune behavior like pause times and motor power.
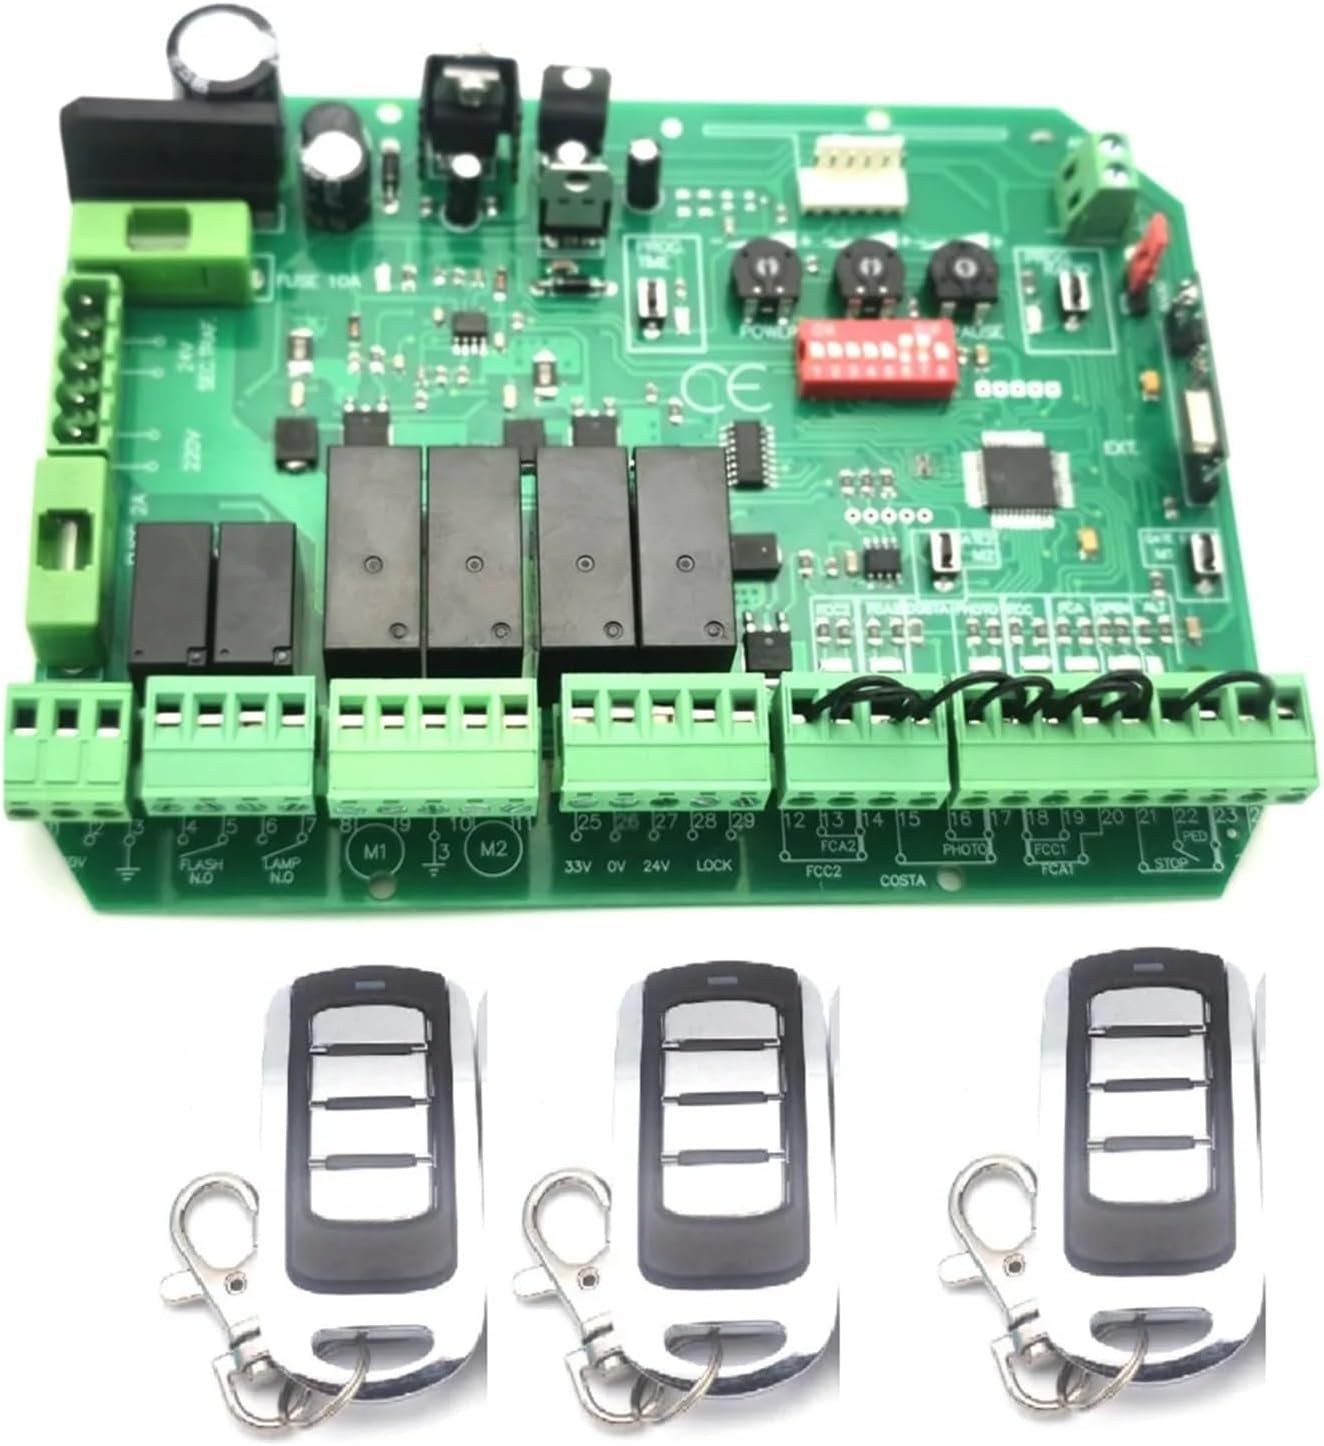
Gate Opener Kit, Universal 24VDC Board for Automatic Double Arms Swing Gate Opener Control Board Panel Smart Control Center System for Driveway Home(Kit2)
Key features explained
You’ll want to know how the main features translate into daily use.
- Dual motor control: The board is built to manage two separate motors (electromechanical or hydraulic), giving independent control for each gate leaf with synchronized or offset timing.
- Programmable offset times: You can set different offset times on opening and closing so one leaf can start or finish earlier than the other, which helps with uneven driveways or staggered traffic flow.
- Buffer stops and obstacle detection: The board supports soft stops (buffers) and detects obstacles during movement, adding protection for people and vehicles.
- Multiple inputs and remote support: Standard START (automatic), STOP, PED (pedestrian), SWITCH and compatibility with additional radio card receiver models gives you flexible control choices.
- Safety behavior: Activating a safety contact during closing triggers a reverse operation, reducing collision risk.
- Light output: A dedicated contact for activating a garage/approach light engages 0.5 seconds before opening and shuts off 3 minutes later by default.
- Power regulation: Motor power settings you select are applied 2 seconds after a maneuver starts, which softens the initial inrush and lets you fine-tune force.
- Pause time programming: You can set pause time (work time plan) so the motor behaves in a specified pattern before finishing a maneuver.
How these features affect daily operation
You’ll get a smoother and safer gate action if you set the offsets and power correctly. Safety integration reduces chances of damage or injury. The light timer and radio support are convenient for home settings where you arrive by car or on foot.
Specifications at a glance
You’ll appreciate a clear summary table to compare the main specs quickly.
| Specification | Details |
|---|---|
| Control voltage | 24 V DC |
| Motor channels | 2 (for two gate leaves) |
| Motor type supported | Electromechanical and hydraulic |
| Programmable options | Offset times (open/close), pause time, power regulator, buffer stops |
| Safety features | Obstacle detection, safety contact reverse on close, STOP input |
| Inputs | START, STOP, PED, SWITCH, external radio buttons |
| Radio support | Supports additional radio card receiver models |
| Light output (garage/approach) | Activates 0.5s before opening, deactivates after 3 minutes |
| Power regulation timing | Applied 2 seconds after maneuver start |
| Typical uses | Residential double-arm swing gates, driveways |
| Installation complexity | Moderate — electrical and mechanical setup required |
Purchase 24VDC Double-arm Gate Opener
What’s in the box and optional extras
You’ll want to check the contents before you begin installation and plan for extra parts you might need.
Standard contents
Usually the kit will include:
- The universal 24V control board (main panel)
- Wiring terminals and some connectors
- A user/programming manual (may be limited; expect some terse instructions)
- Mounting hardware or holes for screws
You’ll need to confirm exact contents with the seller since kits sometimes vary.
Recommended additional items
You’ll often need or want these extras:
- Suitable 24V DC power supply or battery backup if not included
- Remote transmitter/receiver pair (unless you add a compatible radio card)
- Photocells (safety beams) and a flashing warning light
- Mechanical limit switches or sensors for position feedback (if not built into actuators)
- Surge protection and proper grounding hardware
Compatibility and installation considerations
You’ll need to evaluate how the board fits with your existing gate hardware and environment.
Motor compatibility
The board supports both electromechanical and hydraulic motors. If your actuators are hydraulic, make sure their control signals match the board’s expected inputs. Electromechanical motors typically integrate more directly.
Electrical requirements
You’ll need a stable 24V DC supply sized to handle inrush current from two motors. If you plan to use battery backup, pick a battery and charger that can handle the motors’ power draw and the charger’s maintenance profile. Ensure wiring is appropriate gauge for motor currents and run lengths.
Physical installation
Mount the control board in a weather-protected enclosure or inside a gatebox if the kit doesn’t include a sealed housing. You’ll need to keep connectors dry and protected from rodents, moisture, and corrosion. Provide enough space for wiring and future expansion (like a radio card or surge suppressor).
Wiring tips
You’ll want to label wires and follow a wiring diagram strictly. Use dedicated safety loops for photocells and emergency stops. Keep low-voltage signal wires separate from high-current motor runs where possible, and use ferrules or crimp terminals for reliable connections.
Programming and operation explained
You’ll program the board to match your daily routines and safety needs. The main operation modes and inputs are intuitive once you understand the logic.
Basic operation modes
- START: initiates automatic operation (opening or closing sequence depending on context)
- STOP: immediately halts movement and requires a fresh START command to resume
- PED: pedestrian mode for opening only one leaf or performing a partial open
- SWITCH: wall switch or other local control input
- Radio buttons: remote control via compatible radio receiver
You’ll use these inputs depending on whether you want full vehicle access, pedestrian-only access, or manual operation via local switch.
Timing and offset settings
You’ll set offset times to control how the two leaves operate relative to each other. For example, one leaf can start opening immediately while the other starts after a fraction of a second to avoid interference with curbs or slope. You can also set different offsets for opening and closing to accommodate mechanical constraints.
Power and buffer settings
Set the power regulator to match motor torque and gate weight. The board applies the selected power 2 seconds after the start of a maneuver to minimize surge and let the system initiate smoothly. Buffer stops give a soft end-of-travel action that reduces strain on mechanics.
Safety logic
If a safety contact (like a photocell) activates during closing, the board triggers reversal to prevent crushing. STOP overrides everything and makes the system wait for a fresh START, which is useful for emergencies or manual intervention.
")
Safety and compliance
Safety is critical with gate systems. You’ll need to ensure your installation meets local regulations and practical safety measures.
Built-in safety behavior
The automatic reverse on safety contact and obstacle detection are essential protections that help prevent accidents. The STOP input provides emergency stopping that requires re-initiation, preventing unintended restart.
Additional safety devices to use
You should add:
- Photocells across the gate opening to detect pedestrians and vehicles
- Edge sensors on the leading edge of the gate leaves where feasible
- Flashing warning light and an audible alarm for moving gates
- Manual release mechanism in case of power failure or emergency access
Regulatory considerations
Depending on your country or state, residential gate automation may be subject to standards or building codes for safety. You’ll want to verify compliance with local rules, particularly if this is a rental property or you have frequent visitors.
Performance and fine-tuning
You’ll get the best results by spending time adjusting power, offsets, pause times, and safety thresholds.
Tuning motor power
Start with a moderate power setting. If gates operate too slowly, increase the regulator in small steps; if motors stall or trips occur, reduce power. The board waits 2 seconds after the start to apply the configured power, so observe the first two seconds and then the full power phase to ensure no abrupt behavior.
Adjusting offsets
Test opening and closing cycles with different offsets. A short offset may be enough for a slight stagger; longer offsets help when one leaf clears the pavement before the other moves. Close monitoring during the first dozen cycles helps to lock in the best sequence.
Setting pause time
Pause time affects how the motor behaves in a paused state before completing a maneuver. Use shorter pauses for faster traffic flow or longer pauses if you want the gates to remain partially open for pedestrian traffic or loading.
Installation checklist
You’ll find a clear checklist helpful to avoid common mistakes.
- Verify kit contents and obtain a compatible 24V DC power supply.
- Confirm motor type (electromechanical or hydraulic) and compatibility.
- Choose a weatherproof enclosure and mounting location away from direct water exposure.
- Run correct gauge wiring for motor supply and signal lines.
- Install safety photocells and edges in accordance with recommended heights and positions.
- Add a flashing light visible from the road and approach.
- Program offset times, pause time, power regulator and verify safety reversal settings.
- Test many cycles with different scenarios (vehicle, pedestrian, obstacle) before leaving the system unattended.
- Provide a clear emergency manual release and label it for household members.
")
Troubleshooting and common issues
You’ll avoid frustration if you know how to approach common problems.
Gate doesn’t move on START
- Check 24V DC supply voltage and fuses.
- Confirm the STOP input isn’t active (STOP needs a fresh START after activation).
- Verify wiring to motors and motor protection devices (limit switches, overloads).
One leaf moves but the other does not
- Verify motor channel wiring and motor health.
- Check offset programming — an excessive offset might delay movement.
- Inspect mechanical linkages and pivots for binding.
Gate reverses unexpectedly during closing
- Check photocell alignment and cleanliness; a blocked beam will trigger reverse.
- Inspect edge sensors and safety contacts for shorts or false triggers.
- Lower obstacle detection sensitivity if available, but do so cautiously.
Motor stalls or trips motor protection
- Increase wire gauge to reduce voltage drop.
- Adjust power regulator — too low can stall, too high can overload.
- Verify motor health and mechanical friction in the gate travel.
Remote radio not working
- Confirm radio card compatibility and installation.
- Re-pair remotes following the board’s programming steps.
- Check antenna placement and possible RF interference sources.
Pros and cons
You’ll want a balanced view before deciding.
Pros
- Supports two motors with programmable offsets — great for double leaf gates.
- Safety features like obstacle detection and automatic reverse during closing.
- Light timing and flexible inputs (START, STOP, PED, SWITCH, radio) for convenient operation.
- Compatibility with both electromechanical and hydraulic actuators.
- Power regulation and buffer stops for smooth action and reduced mechanical wear.
Cons
- You’ll likely need additional accessories (photocells, remotes, housing) sold separately.
- Programming may be terse in the manual; you’ll have to spend time learning the control logic.
- Installation requires moderate electrical and mechanical skills; you might need a professional if you’re not comfortable.
- Enclosure and surge protection may not be included, so factor these into cost and effort.
Who should install it vs. hire a professional
You can install this yourself if you’re confident with low-voltage wiring, mechanical adjustments to gate actuators, and basic safety device integration. If you’re uncertain about torque settings, power supply sizing, or ensuring compliance with local safety codes, hire a professional installer so you don’t risk damage or liability.
Maintenance and long-term care
You’ll keep the system reliable with routine maintenance.
- Inspect mechanical pivots and fasteners for wear and tightness every 6 months.
- Clean and realign photocells and sensors regularly to avoid false triggers.
- Check wiring for rodents or abrasion and secure loose cables.
- Test emergency release and manual operation at least once a year.
- Keep firmware or programming notes handy; if the board supports updates, apply them following manufacturer guidance.
Real-world use cases and scenarios
You’ll find the board useful in several residential scenarios:
- A sloped driveway where one gate leaf must start later to avoid hitting a curb.
- A busy household where pedestrian access is common and a PED input helps separate modes.
- Homes that want an automatic approach light with timed deactivation to conserve energy.
- Properties where you want to add remote control gradually via compatible radio cards.
Final verdict and buying advice
If you want a flexible, programmable controller for two-leaf swing gates and you’re prepared to supply or add necessary peripherals (power supply, safety devices, radio card), this control board is a solid option. You’ll get practical safety logic, timing controls, and multi-input operation that suit most residential applications. Factor in additional hardware costs and the need for careful setup or professional installation if you lack experience.
Buying tips
- Confirm exactly what the seller includes before purchase so you don’t get surprised by missing essentials.
- Buy photocells and a flashing light kit at the same time for a complete safety setup.
- Consider a professional installer if you’re unsure about mains-to-24V conversion, surge protection, or local compliance.
- Keep spare fuses and a simple wiring diagram in your toolbox for fast troubleshooting.
Frequently asked questions (short)
You’ll often run into similar questions during planning and installation.
Can this board work with my hydraulic actuators?
Yes, the board supports hydraulic drives as well as electromechanical motors, but you must verify that control signal types match and hydraulic control valves respond correctly to the board outputs.
What happens when STOP is activated?
Activation of STOP immediately halts operation and requires a new START command to resume. This prevents unintended restarts after an emergency stop.
How does the garage/approach light behave?
The light contact activates 0.5 seconds before the gate begins opening and turns off 3 minutes after activation. You can use this for short-term illumination during arrival.
Is backup battery support required?
Backup power is optional but recommended if you need gate operation during power outages. Ensure your battery system is sized for the motors’ draw and charge cycles.
Will the board reverse if something blocks the gate?
Yes. If a safety contact like a photocell is triggered during closing, the board will reverse the gate to avoid crushing or collision.
Useful tips before you start
You’ll save time and avoid common errors if you follow a few practical suggestions.
- Read the manual fully and map out your wiring before cutting or connecting any cables.
- Label every wire and take photos of connections during initial setup so you can reproduce them if needed.
- Test safety devices extensively. Nothing beats real-world testing under controlled conditions.
- Keep the software/programming cheat sheet near the board for quick adjustments once the gate is live.
- Consider surge protection and lightning grounding if you live in a storm-prone area.
If you want, you can tell me more about your gate type, motor model, and whether you have a preferred radio receiver brand, and I’ll help you draft a wiring and configuration checklist tailored to your setup.
Get The Gate Opener Kit (24VDC) Now
Disclosure: As an Amazon Associate, I earn from qualifying purchases.