
Are you trying to decide if the Watt Stopper LMRC-212 Digital 2-Relay Room Controller On/Off/Dimming 120/277V, White fits your space and needs?
Buy Watt Stopper LMRC-212 Digital On Amazon
Product overview
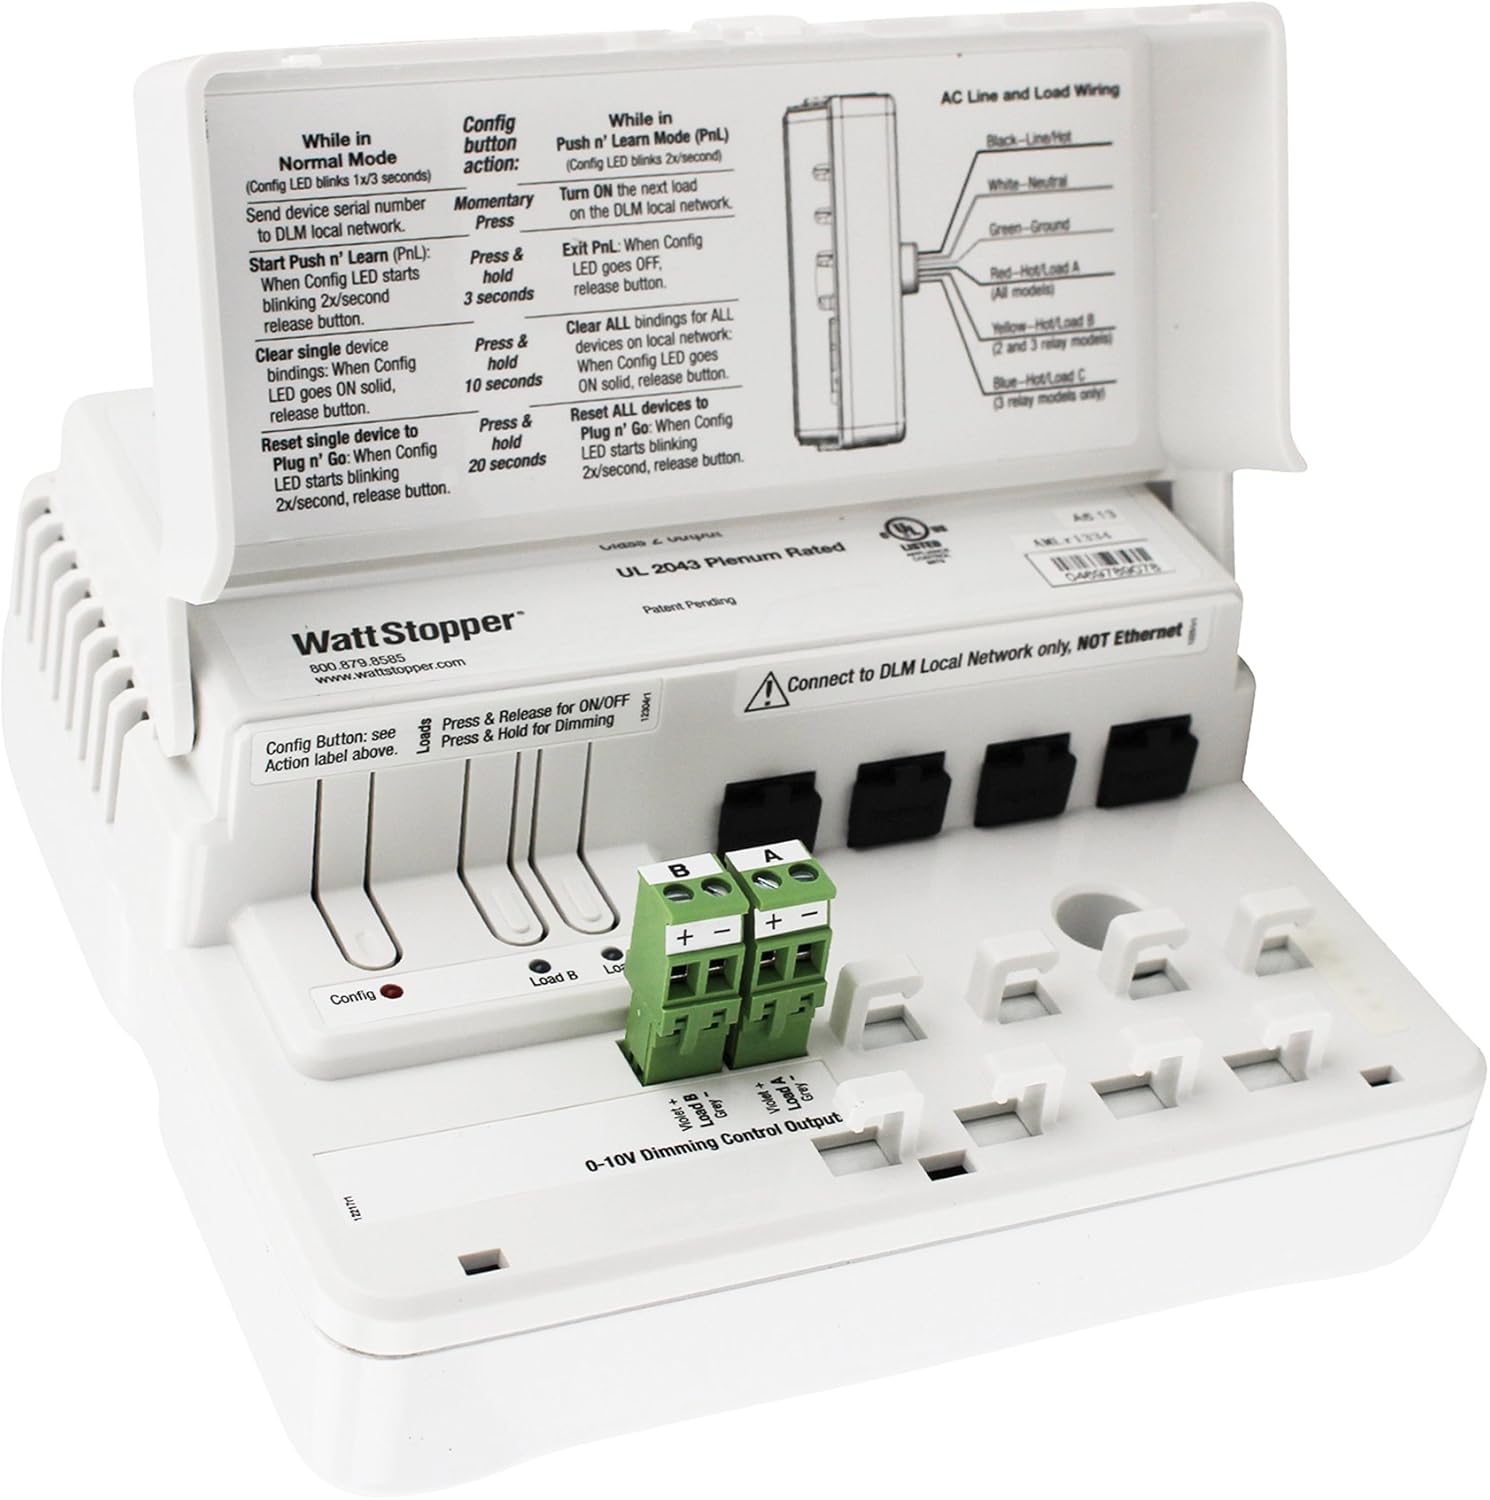
You want a reliable, compact controller that handles both switching and dimming for a small room or zone, and the Watt Stopper LMRC-212 is built for that purpose. The unit is marketed as a Digital 2-Relay Room Controller with RJ-45 connectivity and supports On/Off plus 0–10V dimming control, compatible with 120/277V line voltages and offering a 24VDC control supply at 250 mA.
You’ll find the basic product details quoted here: “Digital 2-Relay Room Controller RJ-45 Connectivity On/ Off/ 0-10 Volt Dimming 120/277V, 20 Amps 24VDC, 250 mA — See more product details.” This gives you a quick snapshot of its main electrical and connectivity capabilities so you can match it to your project requirements.

Watt Stopper LMRC-212 Digital 2-Relay Room Controller On/Off/Dimming 120/277V, White
Key features
You should know the major capabilities before you commit, since they determine where and how the controller will be used. This section summarizes the features that most installers and facility managers care about.
Dual relays for flexible loads
You can control two independent circuits or lighting zones with the two relays, which gives you flexibility in grouping fixtures or separating loads for different control strategies. That means you could power general lighting on one relay and task lighting or a separate fixture group on the other.
On/Off switching plus 0–10V dimming
You’ll have both simple switching and continuous dimming control in the same device, which is useful if your space mixes non-dimmable loads with dimmable LED drivers or ballasts. The 0–10V output lets you interface with most standard dimmable drivers for smooth level control.
RJ-45 connectivity for network integration
You can integrate the controller into a networked lighting system using the RJ-45 jack, making it easier to integrate with building automation, central management software, or other distributed controllers. Network connectivity simplifies commissioning, remote control and diagnostics compared with stand-alone devices.
Broad voltage compatibility and current rating
You’ll be able to use this controller on common building voltages — 120V or 277V — which covers most commercial sites in North America. The device documentation lists a 20 Amp rating (verify per relay or total in your spec sheet) and provides a 24VDC control supply with 250 mA output for powering sensors or control peripherals.
Specifications at a glance
You like quick lookups, so this table groups the most important specs for easy scanning. Use it to confirm compatibility before you begin wiring or purchasing.
| Specification | Details |
|---|---|
| Product name | Watt Stopper LMRC-212 Digital 2-Relay Room Controller On/Off/Dimming 120/277V, White |
| Main functions | On/Off switching, 0–10V dimming |
| Relays | 2 relays (independent) |
| Line voltage | 120/277 VAC |
| Current rating | 20 Amps (confirm per relay or combined with manufacturer docs) |
| Control supply | 24 VDC, 250 mA |
| Connectivity | RJ-45 network port |
| Mounting | In-wall/room controller (white housing) |
| Typical applications | Classrooms, small conference rooms, private offices, task/ambient lighting control |
| Manufacturer | Watt Stopper |
Physical design and build
You want a controller that’s unobtrusive and dependable, which is what this product aims to provide. The white housing helps it blend into common drop-in wall or room controller locations and electrical enclosures.
You’ll appreciate that the LMRC-212 is sized to fit in typical in-wall or wallbox installations and is intended to be installed with standard wiring practices. Its connectors are designed for commercial wiring standards and for compatibility with sensors and switches you might already be using.
Purchase The Watt Stopper LMRC-212 Digital On Amazon
Installation and setup
You’ll want to plan the installation carefully to avoid mistakes; the following guidance will help you prepare. Always follow local electrical codes and the manufacturer’s installation manual when you wire or mount the controller.
Tools and materials you’ll need
Having the right tools at hand makes the install faster and safer. You’ll typically need basic electricians’ tools, mounting hardware, and the correct gauge wire for the loads you plan to control.
You should also prepare any sensors, wall switches, or interface devices that will connect to the controller and make sure you have a network cable for the RJ-45 connection if you plan to integrate it with a system.
Wiring and safety
You need to cut power before you start and verify that circuits are de-energized. Correct wiring ensures the relays switch the intended loads and prevents nuisance trips or damage to connected equipment.
Follow these best practices: use the proper wire gauge for the 20 Amp circuits you’ll control, label conductors, follow polarity for 0–10V dimming leads, and tie the 24VDC supply only to devices rated for that voltage. Grounding and bonding must match your local code requirements.
Mounting and physical placement
You’ll want to place the controller in a location that’s accessible for service but not exposed to excessive moisture or heat. Typical placements include above-ceiling cavities, dedicated control cabinets, or back-of-room wall boxes.
The physical orientation should allow easy access to wiring terminals and the RJ-45 port for network access and troubleshooting. Consider cable strain relief and leave extra wire for future servicing.
Network configuration and commissioning
You’ll configure the controller on the lighting network using your system’s commissioning tools or software after physical installation. The RJ-45 port simplifies this process, but you’ll need the network settings, addressing scheme and any required gateway or controller credentials.
During commissioning, you’ll map relays to zones, assign dimming parameters, verify zero-to-full dimming ranges, and ensure coordinated scenes or schedules operate as expected. If the system supports remote firmware updates or diagnostics, you can perform those steps through the network as well.
Performance and reliability
You care about responsiveness and long-term reliability, and this controller is built to handle frequent switching and dimming in commercial environments. Relays are rugged and designed to withstand many cycles, and the electronics for dimming are tuned for stable operation with compatible drivers.
You’ll want to verify dimming compatibility with the LED drivers and ballasts in your project to avoid flicker or limited dimming range. When properly matched, the 0–10V outputs provide smooth dimming behavior and predictable control for scenes and scheduling.
Compatibility and load considerations
You should confirm that your lighting fixtures and drivers are compatible with 0–10V control before relying on dimming features. The LMRC-212’s 0–10V interface is standard, but performance depends on the connected drivers’ input circuits and control curve.
If you plan to control non-dimmable loads, you’ll use the On/Off relay function. For dimmable LED or fluorescent fixtures, confirm the compatible driver types and check manufacturer charts for minimum load, inrush current, and any required bypass or filtering components.
User experience and daily use
You’ll likely interact with the controller indirectly through wall switches, occupancy sensors, or a central management system, so your daily experience centers on how well it integrates with other devices. When configured correctly, on/off and dimming responses should feel immediate and predictable.
If your facility uses schedules or occupancy-based control, you’ll notice energy savings and reduced manual intervention. The networked RJ-45 connection also helps remote troubleshooting and logging, which reduces service calls and downtime.

Troubleshooting common issues
When things don’t work as expected, there are a few common areas you can check before calling support. This section outlines practical steps you can take to diagnose and correct many typical problems.
No power to controller or relays
You should verify the line voltage feeding the controller, check circuit breakers or fuses, and confirm that neutral and ground are properly connected. If the controller has diagnostic LEDs, those will often indicate presence of supply power.
If line power is present but relays don’t actuate, verify control logic and any software-level overrides in the network controller, and confirm that safety interlocks or occupancy sensors are not holding outputs off.
Dimming flicker or unstable light levels
You might see flicker if the connected LED drivers aren’t compatible with the 0–10V control standard, or if ground and common reference wiring is poor. Check the driver manufacturer’s compatibility list and ensure that the control wiring is shielded or routed away from high-voltage lines to minimize interference.
If dimming range is restricted, adjust the minimum and maximum output levels in the system commissioning tools, and confirm that the dimming reference (ground/common) is properly tied according to the wiring diagram.
Network connectivity problems
You should verify the RJ-45 cable, connectors, switch ports and network configuration. Try a simple link test and confirm IP addressing (if applicable) and any VLAN assignments. If the controller shows intermittent disconnects, check for switch power issues, cable damage, or EMI sources that could affect signaling.
If the system uses proprietary protocols or requires gateway devices, ensure those components are online and bridging correctly.
Maintenance and firmware updates
You’ll want to include the LMRC-212 in your routine preventive maintenance schedule so performance remains reliable over time. This includes verifying wiring tightness, checking for overheating, confirming firmware is current, and testing relay operation.
If the controller supports firmware updates over the network, apply manufacturer-recommended updates during scheduled maintenance windows. Keeping firmware current can improve stability, add features, and fix known issues.
Safety and code compliance
You must follow local electrical codes and building regulations when installing and using the controller. Ensure that the device is installed in approved enclosures and that branch circuit protection matches the loads and wiring.
You’ll also want to verify that the controller’s use aligns with any occupancy sensor, emergency lighting and life-safety control requirements. For applications with emergency circuits, ensure proper separation and fail-safe behavior per code.
Pros
You’ll find several clear advantages to using this controller in the right application:
- Flexible control: Handles both switching and dimming from the same compact device, simplifying installations where mixed loads exist.
- Networked capability: RJ-45 connectivity makes system integration, monitoring and commissioning easier than a purely hard-wired solution.
- Wide voltage range: Designed for 120/277V operation, which suits most commercial spaces in North America.
- Compact: Two relays in one device saves space and reduces the number of separate controllers you need.
- 24VDC supply: Onboard low-voltage supply for sensors or auxiliary devices reduces the need for separate power supplies.
You’ll appreciate these benefits when planning zones, consolidating control gear, or managing a networked lighting strategy.
Cons
There are trade-offs you should consider before specifying or purchasing this unit:
- Limited to two relays: If you need more zones, you’ll either need multiple controllers or a different multi-relay device.
- Dimming compatibility: 0–10V performance depends on the drivers and fixtures you pair with the controller; incompatible drivers can cause poor dimming performance.
- Network specifics: You’ll need to verify the communication protocol supported over RJ-45 and ensure it matches your building management system or network topology.
- Installation knowledge: Proper wiring and commissioning require familiarity with commercial electrical practices and lighting control systems.
Thinking through these constraints helps you avoid surprises during installation and operation.
Typical use cases and recommendations
You can use the LMRC-212 in many commercial scenarios where two independent loads or zones are appropriate. Here are the most common applications where it makes sense.
Small conference rooms and classrooms
You’ll control general illumination and separate task or projection lighting independently, enabling scene-based control and simplified AV integration in meeting spaces. The dimming option allows for optimized screen viewing and variable lighting levels.
Private offices and small suites
You can provide individual control for ambient and task lighting, supporting occupant comfort while enabling centralized scheduling for energy savings when spaces are unoccupied.
Corridors and ancillary spaces
You’ll benefit from simple on/off control for corridor lighting while still having dimming capability if you want to reduce levels during off-hours rather than fully turning lights off.
Retrofit projects
If you’re upgrading older systems, the compact dual-relay form factor often simplifies retrofits by reducing additional enclosure space and allowing you to reuse existing wiring where appropriate.
Comparison to alternative solutions
You’ll want to compare the LMRC-212 against other approaches to make sure it’s the best choice for your project budget and control architecture.
- Single-relay controllers: If your needs are minimal, a single-relay device might be cheaper and simpler, but you’ll give up the flexibility of controlling two independent loads with one unit.
- Multi-relay panels: Larger panels with many relays centrally located are great for multi-room projects, but they require more wiring and may not be ideal for distributed control strategies.
- Protocol-specific controllers: Some controllers have native BACnet, LON, or other protocols. Verify whether the LMRC-212 supports the protocol you require over its RJ-45 connection or whether an intermediate gateway is necessary.
You’ll choose based on the scale of the project, required features and the integration strategy you adopt for your building’s management system.
Cost considerations and return on investment
You should evaluate purchase price, installation labor and energy-savings potential when calculating ROI. The LMRC-212 tends to reduce wiring and space compared to multiple single-function devices, and energy savings from networked scheduling, occupancy control and dimming can be significant over time.
You’ll also want to consider reduced maintenance costs through centralized monitoring and the potential to update control strategies without expensive hardware swaps.
Frequently asked questions (FAQ)
You often have practical questions before and after installation, so here are answers to the most common ones.
Will this controller work with all LED fixtures?
You’ll need to confirm that the LED drivers accept 0–10V control. Many modern drivers do, but you should check the driver datasheet for compatibility, minimum load requirements and recommended wiring practices.
Is the 20 Amp rating per relay?
You should consult the official product documentation to verify whether the 20 Amp rating applies per relay or is a combined rating. When in doubt, follow the manufacturer’s wiring and load tables so you don’t exceed safe limits.
Can I power occupancy sensors from the 24VDC supply?
Yes, the 24VDC, 250 mA supply can typically power sensors and similar low-voltage peripherals, but confirm current requirements of each device and total load so you don’t overload the supply.
How do I get remote monitoring and scheduling?
You’ll connect the RJ-45 port to your lighting network or building management system and use the commissioning/configuration software to define schedules, scenes, and monitoring parameters. Check compatibility with your central system before deployment.
What troubleshooting steps should I take if lights flicker?
You’ll want to check wiring for loose connections, verify driver compatibility with 0–10V control, and ensure proper grounding. If flicker persists, test with a known compatible driver or consult Watt Stopper support.
Troubleshooting checklist
You’ll find this checklist handy during commissioning or service calls. It’s a practical sequence of steps to identify common failures.
- Verify main power and circuit protection.
- Confirm correct wiring to relays, neutral and ground.
- Check sensor and switch wiring and configurations.
- Validate RJ-45 network connection and communication status.
- Confirm 0–10V dimming wiring, polarity and driver compatibility.
- Test relays manually (if allowed) from commissioning software to isolate load vs. controller issues.
- Review firmware status and apply updates if available.
- Contact manufacturer support with wiring photos and diagnostic logs if needed.
Warranty and support
You’ll want to know what support and warranty coverage you can expect before committing. Watt Stopper typically provides manufacturer warranty and technical support for their control products, but you should confirm warranty length and support channels at time of purchase.
You’ll also want to keep records of installation dates and any commissioning notes to streamline support if you ever need it.
Environmental considerations
You should place the controller where it won’t be exposed to excessive moisture, corrosive atmospheres or extreme temperatures. Proper placement increases longevity and reduces the risk of environmental-related failures.
Additionally, you can use the controller to reduce energy consumption by enabling occupancy-based control and dimming strategies, which aligns with sustainability goals and may help with utility rebate qualification.
Installation checklist
You’ll appreciate a simple checklist to follow before you begin wiring and commissioning the controller.
- Confirm project requirements and verify that two relays meet zone control needs.
- Verify fixture and driver compatibility for 0–10V dimming.
- Gather tools and wire of appropriate gauges.
- Power down circuits and lock out/tag out before working.
- Mount the controller in a suitable enclosure or wall box.
- Make line, neutral, ground and control connections per wiring diagram.
- Connect RJ-45 network cable and verify link.
- Apply power and perform commissioning tests, scene setup and schedule configuration.
- Document configuration and label wiring for future service.
Final recommendation
You should consider the Watt Stopper LMRC-212 Digital 2-Relay Room Controller On/Off/Dimming 120/277V, White when you need a compact, network-ready device that combines switching and dimming in a single package. Its dual-relay design, 0–10V capability and RJ-45 connectivity make it a solid choice for classrooms, small conference rooms, private offices and similar commercial spaces.
You’ll want to confirm a few details—especially current rating specifics, dimmer compatibility with your LED drivers, and the network protocol carried over the RJ-45 port—before you finalize the purchase. When matched properly to your fixtures and integrated into your building control system, the LMRC-212 can deliver reliable control, energy savings and reduced commissioning complexity.
If you’d like, you can tell me the specific fixtures, sensors and network system you plan to use, and I’ll help you verify compatibility and outline the exact wiring and commissioning steps tailored to your setup.
Shop Watt Stopper LMRC-212 Digital — Amazon
Disclosure: As an Amazon Associate, I earn from qualifying purchases.