
Are you ready to get smarter control over your irrigation schedule without complicated electronics?

Buy Intermatic R8816P101C On Amazon
Quick Summary
You’ll find the Intermatic R8816P101C Sprinkler & Irrigation Timer, 240V 3Hp DPST – Customizable Water Conservation with 14-Day Skipper – Rain-Ready, Smart Watering Control for Efficient Irrigation useful if you want a straightforward, mechanically driven solution for sprinkler control. This timer gives you frequent on/off capability, a variety of interval options, and compatibility with a rain sensor so you can manage water usage more efficiently without a steep learning curve.
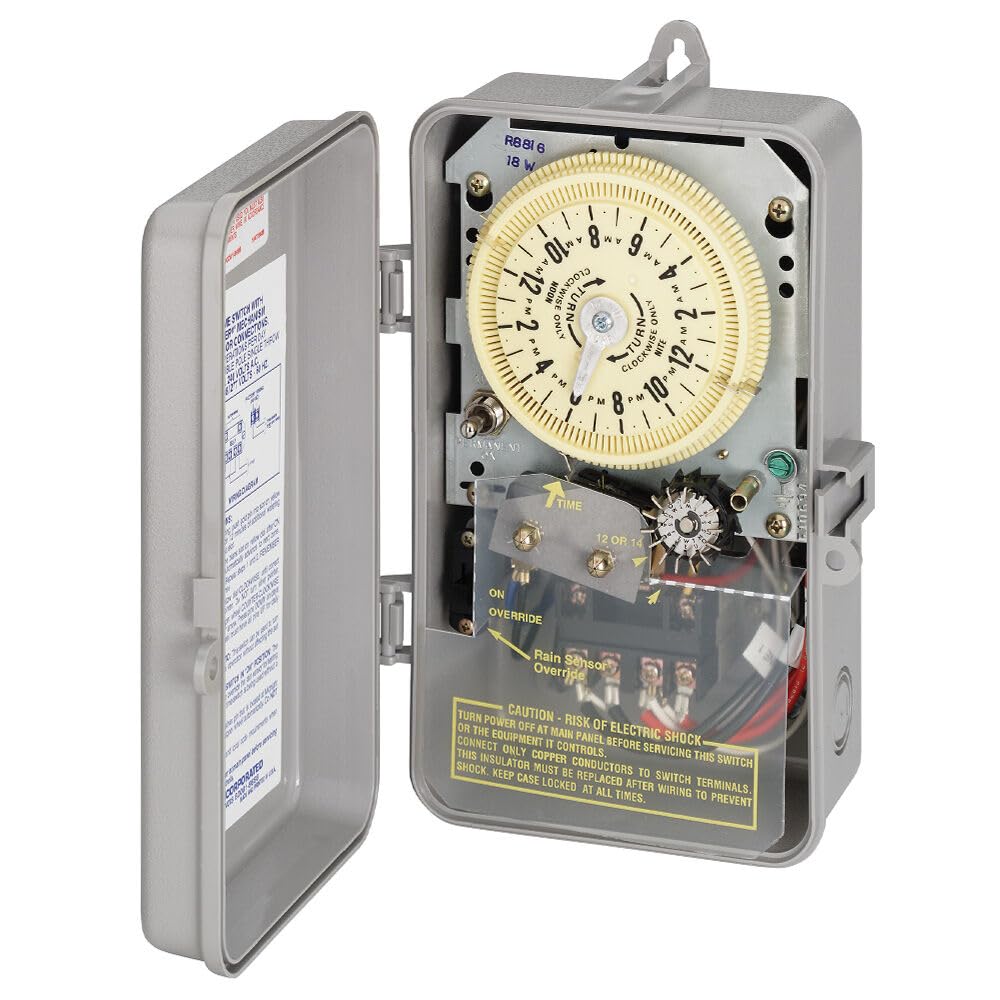
Intermatic R8816P101C Sprinkler & Irrigation Timer, 240V 3Hp DPST - Customizable Water Conservation with 14-Day Skipper - Rain-Ready, Smart Watering Control for Efficient Irrigation
Key Features
You should notice right away that the R8816P101C focuses on simple, dependable control rather than bells and whistles. The key features target water conservation, scheduling flexibility, outdoor durability, and easy integration with external sensors for automated rain shutoff.
Customizable Water Conservation
You’ll appreciate the precision the timer offers with up to 44 ON/OFF operations every 24 hours, letting you schedule short cycles multiple times a day. Those multiple cycles can help you apply water more evenly and reduce runoff, which is especially helpful for sandy soils or newly seeded lawns.
Smart Watering Control
You’ll find timing increments that range from 12 minutes up to 20 hours and 45 minutes, giving you a large window to set durations that match your irrigation zones. The ability to combine long and short cycles across the day lets you tailor watering to plant types and soil absorption rates.
Rain-Ready Design
You’ll like the built-in on/off/automatic switch that gives quick manual control during unpredictable weather, enabling an immediate shutdown when it’s rainy or a quick restart during dry spells. For automatic rain-triggered control, you can attach a compatible Rain Sensor (sold separately) so the system pauses cycles when moisture is sufficient.
Reliable & Versatile
You’ll find it designed for outdoor use and rated for 240V, 3Hp DPST applications, making it suitable for many residential and light commercial sprinkler systems. Because it uses a mechanical timer mechanism, it tends to be straightforward to troubleshoot and less prone to software glitches that affect digital units.
Effortless Integration
You’ll be able to enhance water-saving strategies by adding a Rain Sensor (sold separately) that interrupts irrigation automatically when rain is detected. Integrating the sensor is a low-cost upgrade that dramatically increases the timer’s utility in wet climates or transitional seasons.
Product Specification Table
You’ll find the summary below useful for quick comparison and clarity on what this timer delivers. The table breaks out the main specs so you can match them to your system needs.
| Specification | Details |
|---|---|
| Product Name | Intermatic R8816P101C Sprinkler & Irrigation Timer, 240V 3Hp DPST |
| Power Rating | 240V, 3Hp |
| Type | Mechanical timer, DPST (Double Pole Single Throw) |
| ON/OFF Operations | Up to 44 per 24 hours |
| Time Increments | 12 minutes to 20 hours 45 minutes |
| Skipper Options | Up to 14-day skipper (skip watering days) |
| Rain Sensor | Compatible (sold separately) |
| Switch Positions | On / Off / Automatic |
| Weather Resistance | Designed for outdoor use |
| Ideal Applications | Residential and light commercial sprinkler systems |
Performance in Real-World Use
You’ll want to know how the R8816P101C acts once it’s installed, and this timer tends to perform predictably in daily irrigation tasks. The mechanical nature gives a feel of dependability: it will switch reliably when set and maintain cycles even through power variations, provided wiring and installation are proper.
Scheduling Precision
You’ll be able to set short pulses for cycle-and-soak techniques as well as longer runs for deep watering, because the timer supports both frequent ON/OFF operations and long-duration increments. That level of control helps you reduce runoff and better match irrigation to specific plant needs.
Power and Compatibility
You’ll need to verify that your sprinkler valves and pumps are compatible with a 240V, 3Hp DPST timer, and most medium-duty residential systems will be compatible or can be adapted easily. The double-pole switching helps you manage two conductors safely when you’re controlling higher voltage equipment.
Outdoor Durability
You’ll appreciate the rugged design meant for outdoor locations, though you should still mount it under a protective enclosure or in a covered weatherproof box to prolong life. The mechanical components are less sensitive to temperature swings than some digital electronics, but preventing direct water exposure will still increase longevity.

Purchase Intermatic R8816P101C Sprinkler & Irrigation Timer
Installation & Setup
You’ll find the timer generally straightforward to install if you have basic electrical and irrigation wiring knowledge, but you should follow local codes and safety practices. The timer’s mechanical design simplifies setup compared to multi-zone electronic controllers, but proper wiring and grounding are crucial.
What You’ll Need
You’ll want a few basic tools: a screwdriver, wire strippers, a multimeter for verifying voltages, and a weatherproof enclosure if the installation location is exposed. You should also plan to have your sprinkler valve wiring diagram or notes about which valves correspond to which zones to make setup faster.
Step-by-Step Installation
You’ll first cut power to the irrigation circuit at the breaker, then mount the unit and connect incoming 240V supply lines to the designated terminals, following the wiring diagram provided with the unit. After you wire the load (pump or valves) and optionally connect the rain sensor, you should restore power and run through a few manual cycles to confirm operation before leaving it on automatic.
Wiring Tips
You’ll want to ensure all connections are secure and moisture-protected, using appropriate connectors or terminal blocks and sealing any openings to the enclosure. If you’re not confident with 240V wiring, you’ll do well to hire a licensed electrician to avoid safety hazards and code issues.
Programming and Operation
You’ll get the feel of this timer quickly because it uses tactile controls and a straightforward setting approach, which is ideal if you prefer hands-on adjustment rather than app-driven programming. The programming model balances frequent short cycles with options for longer intervals and includes a skipper feature to skip watering every few days for seasonal moderation.
Setting On/Off Operations
You’ll set ON/OFF operations in increments that allow for as many as 44 start/stop events per day, so you can schedule multiple brief cycles across morning and evening if that’s ideal for your soil and plants. Remember to spread cycles to allow soak periods between them to avoid surface runoff.
Using the 14-Day Skipper
You’ll use the skipper option to tell the timer to skip watering on a recurring basis—for instance, every 7th or 14th day—so you don’t have to manually adjust programming for seasonal moisture needs. This helps you conserve water by avoiding unnecessary irrigation during periods of adequate rainfall or cooler weather.
Manual Mode and Emergency Shutdown
You’ll find the On/Off/Automatic switch handy when you need to run a manual cycle or stop everything immediately during heavy rain or maintenance. Flipping to “Off” gives you a simple, instant way to suspend all scheduled activity without reprogramming.
Integration with Rain Sensors
You’ll be able to turn the timer into a rain-smart controller by adding a compatible Rain Sensor (sold separately), which is recommended if weather can frequently interrupt your watering schedule. The sensor wiring typically interrupts the timer’s control circuit when it senses rainfall, preventing wasted irrigation without needing to adjust the schedule manually.
Types of Rain Sensors to Use
You’ll choose between simple mechanical sensors and electronic sensors depending on your preference for sensitivity and installation ease; both types typically integrate with the R8816P101C. Make sure you pick a sensor rated for outdoor use and compatible with the timer’s wiring layout.
Sensor Wiring and Placement
You’ll mount the sensor in an open area away from roof overhangs to ensure accurate rainfall detection, and run its leads back to the sensor terminals on the timer, following the manufacturer’s instructions. Placement is important: a sensor located under eaves or tree cover might not receive accurate rainfall data, preventing proper shutoff.
Maintenance & Troubleshooting
You’ll appreciate that maintenance is minimal for this mechanical timer, but periodic checks will help you avoid problems from weather, wiring corrosion, or mechanical wear. A simple annual inspection and occasional cleaning of terminals should keep things running smoothly for several years.
Routine Maintenance Tasks
You’ll want to visually inspect the enclosure for water intrusion, ensure terminal screws are tight, and verify that the mechanical dial moves freely at least once per season. Lubrication is rarely necessary; if components feel stiff, addressing the cause (debris, corrosion) is better than applying household lubricants that might attract dirt.
Common Problems and Fixes
You’ll troubleshoot common issues like the timer not powering on, failing to switch loads, or skipping cycles by checking power at the input terminals, confirming correct wiring, and verifying manual switch position. If the timer clicks but the load doesn’t engage, check the output wiring and the connected valve or pump for faults before replacing the timer.
Resetting and Reprogramming
You’ll reset or reprogram by following the instructions in the manual to clear the mechanical settings and re-establish your desired ON/OFF operations, which is straightforward given the tactile controls. If you lose time settings due to power interruptions, ensure the timer dial is aligned correctly and run a few manual cycles to verify everything’s correct.

Advantages and Limitations
You’ll notice clear advantages in reliability, simplicity, and cost-effectiveness with this mechanical timer, but there are limitations compared to modern smart controllers that offer remote apps and multi-zone digital scheduling. Understanding these trade-offs will help you decide whether the R8816P101C meets your needs.
Pros
You’ll like the robust, mechanical design that means fewer software problems and a long service life in many installations. The ability to run up to 44 operations per day and the 14-day skipper makes water management flexible without complexity.
- Simple, tactile controls that are easy to adjust.
- Durable design suitable for outdoor mounting with protection.
- High number of daily on/off operations for cycle-and-soak strategies.
- Compatible with Rain Sensor for automated weather response.
- Suitable for 240V, 3Hp loads, covering many residential pumps and valves.
Cons
You’ll find that the R8816P101C lacks advanced features like Wi-Fi connectivity, multi-zone digital programming, or smartphone alerts that come with modern smart controllers. If you want remote monitoring or programming from your phone, this mechanical timer won’t provide that functionality.
- No remote or app-based control.
- Limited to DPST switching and mechanical timing increments.
- Requires manual wiring and potentially professional electrical help for 240V systems.
- Some users prefer a digital interface for visual confirmation of programming.
How it Compares to Alternatives
You’ll want to weigh mechanical reliability against the convenience of digital controllers, and the R8816P101C finds a niche for homeowners who prefer simplicity and fewer points of failure. In many settings, you’ll prefer this timer for its predictability and lower complexity, while others might opt for a smart controller if remote control and detailed scheduling per zone are crucial.
Mechanical vs Digital Timers
You’ll see that mechanical timers like this one are often easier to repair and less sensitive to power fluctuations, while digital timers offer more granular programming and remote access. If you value robustness and manual control, the mechanical option typically wins; if you want automation and notifications, the digital controller is better.
Price and Value
You’ll often find the Intermatic R8816P101C priced competitively compared to complex multi-zone smart controllers, giving good value for straightforward irrigation tasks. The lower price, combined with fewer potential software or connectivity issues, can make it a cost-effective choice for many users.
Who Should Buy This
You’ll consider this timer if you want a reliable, no-nonsense solution for controlling a small to medium irrigation system with higher-voltage loads. It’s especially suited to those who prefer mechanical controls, need DPST 240V switching, and want the ability to add a rain sensor without paying for advanced connectivity features.
Ideal Use Cases
You’ll find it ideal for single-pump control, single- or few-zone systems that rely on valve manifolds or a pump start relay, and situations where frequent short cycles (cycle-and-soak) are needed to reduce runoff. Landscapers and property owners who run medium-duty pumps will particularly value the 3Hp rating.
Situations to Avoid
You’ll likely avoid this timer if you need multi-zone individual station control, smartphone-based programming, or cloud-based irrigation schedules. Also, if you’re uncomfortable with 240V wiring, plan to hire a professional or choose a low-voltage controller that fits your comfort level.
Buying Tips
You’ll want to confirm the electrical characteristics of your irrigation system before ordering to ensure compatibility with 240V and the 3Hp rating. Consider whether a rain sensor will be included in your final setup and budget for that accessory to get the most out of the timer’s rain-ready capability.
What to Check Before Purchase
You’ll verify the amperage requirements of your valve manifold or pump and match them to the timer’s rating, and you’ll check that your installation can accept a DPST mechanical timer. Also confirm mounting space and whether you need a weatherproof enclosure for outdoor exposure.
Accessories to Consider
You’ll consider purchasing a compatible Rain Sensor, a lockable outdoor enclosure if your unit will be exposed, and any necessary conduit and connectors for professional-grade wiring protection. Buying a multimeter or hiring an electrician for the initial setup can save headaches later.
Troubleshooting Guide
You’ll find a few simple checks can resolve most common problems, so follow a methodical approach before assuming a component failure. Most issues trace back to power, wiring, sensor integration misconfiguration, or mechanical blockage.
No Power to Timer
You’ll check the breaker and incoming voltage first, ensuring the supply feeds the timer correctly and that any upstream switches are closed. If voltage is present but the unit still appears dead, verify internal fuses if applicable and consult the manual for model-specific guidance.
Timer Runs but Valves Don’t Operate
You’ll inspect the output wiring and the valve coil continuity, since the timer might be switching but the valves or pump could be faulty. Use a multimeter to confirm output switching and measure the coil resistance to ensure valves are within expected specifications.
Erratic Cycling or Missed Cycles
You’ll check dial alignment, mechanical wear, and whether the rain sensor or external interlocks are inadvertently interrupting the program. Make sure the On/Off/Automatic switch is fully seated in Automatic for scheduled operation and confirm timer pins or tabs are correctly set.
Safety and Compliance
You’ll prioritize safety when dealing with 240V circuits; proper grounding, correct wire sizing, and code-compliant enclosures are essential to avoid hazards. If you’re not licensed or experienced with high-voltage wiring, you should hire a qualified electrician for installation.
Electrical Safety Tips
You’ll always turn off power at the breaker before working on wiring and double-check power is disconnected with a multimeter. You’ll also use insulated tools and wear appropriate protective gear, and ensure all connections are secured and protected from weather exposure.
Local Codes and Permits
You’ll check local electrical and plumbing codes because some jurisdictions require permits for irrigation pump and high-voltage electrical work. Compliance ensures safety, avoids potential fines, and maintains insurance coverage for the property.
Environmental and Water-Saving Impact
You’ll notice this timer is designed to help you conserve water by enabling more frequent, tailored cycles and by supporting a rain sensor for automatic shutoff during wet conditions. Thoughtful scheduling and sensor integration can lead to significant water savings over a season.
Best Practices for Conservation
You’ll schedule cycles early in the morning or late in the evening to minimize evaporation, and use cycle-and-soak programming to improve soil absorption while preventing runoff. Pairing the timer with a properly placed rain sensor and seasonal adjustments will multiply the conservation benefits.
Measuring Savings
You’ll track meter readings or use irrigation volume estimates to quantify savings after switching to a more precise schedule with frequent, shorter cycles. Comparing seasonal water bills year-to-year will give you a practical sense of the timer’s financial impact.
Final Verdict
You’ll find the Intermatic R8816P101C an excellent choice if you want a sturdy, mechanically simple controller that supports high-voltage loads and frequent on/off cycles for effective water management. It won’t satisfy users looking for cloud connectivity or per-station digital control, but it provides dependable performance, compatibility with rain sensors, and a practical feature set for many irrigation needs.
Frequently Asked Questions
You’ll benefit from these common questions answered concisely so you can make an informed decision quickly and confidently. These FAQs cover compatibility, sensor use, and installation concerns.
Q: Can I use this timer for multiple separate valve zones?
A: You’ll typically use this timer for single-pump or single-load control rather than controlling multiple isolated low-voltage zones; if you need per-zone scheduling, a multi-station controller is more appropriate. The R8816P101C is designed for higher-voltage DPST loads rather than numerous individual solenoids.
Q: Will a rain sensor work with this model?
A: You’ll be able to connect a compatible rain sensor to automatically suspend irrigation when precipitation is detected; the sensor is sold separately. Proper wiring and placement of the sensor are essential to ensure reliable shutoff.
Q: Is professional installation required?
A: You’ll be able to install it yourself if you have experience with 240V wiring and irrigation systems, but hiring a licensed electrician is recommended if you’re unsure. Safety and code compliance are important, and professional installation reduces risk.
Q: How often should I perform maintenance?
A: You’ll typically do a basic inspection annually, checking terminals, mounting, and mechanical operation, and perform additional checks after severe weather. Address any signs of corrosion or stiffness immediately to prevent failures.
Q: Does the timer keep settings during power outages?
A: You’ll likely need to verify settings after a prolonged outage because mechanical timers can lose alignment or require reseating of the dial if power loss affects the mechanism. It’s a good habit to run a quick manual test after power is restored.
If you want, you can tell me about your current irrigation setup (pump voltage, number of zones, valve types) and I’ll help you determine whether the Intermatic R8816P101C fits your needs and what accessories you should add for best performance.
Get The Intermatic R8816P101C Timer Now
Disclosure: As an Amazon Associate, I earn from qualifying purchases.