
Want a simple way to run an irrigation valve without a controller, wiring, or trenching?
Product review: Hunter Node 100 Battery Operated Sprinkler Timer with Solenoid, Waterproof Irrigation Controller for Valves, Wireless, Outdoor, Easy Install, No Wiring Needed for Drip or Remote Systems
You’ll find this model aimed at making valve control nearly plug-and-play for remote zones and off-grid locations. It’s built by Hunter Industries and packaged as a rugged, battery-powered solution that clamps to valves and manages schedules without a central controller.
What this product is for
This unit is meant for controlling single valves where running power isn’t practical or where a simple, stand-alone solution is preferred. You can use it in valve boxes, detached lawns, drip zones, or any setup where a quick, weatherproof timer is useful.

Hunter Node 100 Battery Operated Sprinkler Timer with Solenoid, Waterproof Irrigation Controller for Valves, Wireless, Outdoor, Easy Install, No Wiring Needed for Drip or Remote Systems
$115.05 In Stock
Quick specification table
This table breaks down the basic specs so you can scan the essentials quickly. It’s useful when you’re comparing features or preparing for installation.
| Attribute | Detail |
|---|---|
| Product name | Hunter Node 100 Battery Operated Sprinkler Timer with Solenoid |
| Power source | One or two 9V batteries (user-supplied) |
| Solenoid | Pre-wired DC-latching solenoid included |
| Run time | Up to 6 hours per program |
| Programs | 3 programs with 4 start times each |
| Seasonal adjustment | Yes |
| Suspend mode | Up to 99 days |
| Water sensing | Compatible with Hunter Rain-Clik sensor |
| IP rating | IP68 waterproof |
| Mounting | Direct to valve, flat surfaces, pipe, or inside valve boxes |
| Memory | Easy Retrieve memory to restore schedule |
| Compatibility | Works with DC-latching solenoids |
Key features and why they matter
You’ll want to understand the main selling points so you can judge whether this fits your setup. These features emphasize portability, toughness, and simple scheduling.
Installs in minutes — no controller or wiring needed
This unit comes with a pre-wired solenoid so you don’t need to run low-voltage wiring back to a central controller. You’ll mount the timer directly to most irrigation valves, which eliminates trenching and the need for an extra controller box.
Power anywhere — remote, off-grid, and drip zones
You can run the Node 100 on a single 9V battery (or two for longer life), making it ideal for remote or detached zones without electrical service. You’ll also get a built-in battery-life indicator to help you anticipate when to replace batteries.
Waterproof and outdoor-ready — IP68 rating
The Node 100’s housing is IP68-rated, so you can expect protection against rain, mud, and even temporary submersion. You can safely install it inside valve boxes or in direct-burial locations without worrying about seasonal weather.
Smart scheduling with advanced controls
This controller supports three separate programs with four start times each, offering up to six hours of runtime per program. You’ll also get seasonal adjustment, suspend mode (up to 99 days), cycle-and-soak capability for water conservation, and sensor compatibility for rain shutoff.
Hunter quality and flexible mounting
You’re getting a product from Hunter Industries, a trusted irrigation brand, and features like Easy Retrieve memory to restore your full schedule if the battery dies or the unit is replaced. Mounting is flexible: it works with DC-latching solenoids and can be placed on valves, pipes, flat surfaces, or inside valve boxes.
Purchase Hunter Node 100 Battery-operated Sprinkler Timer
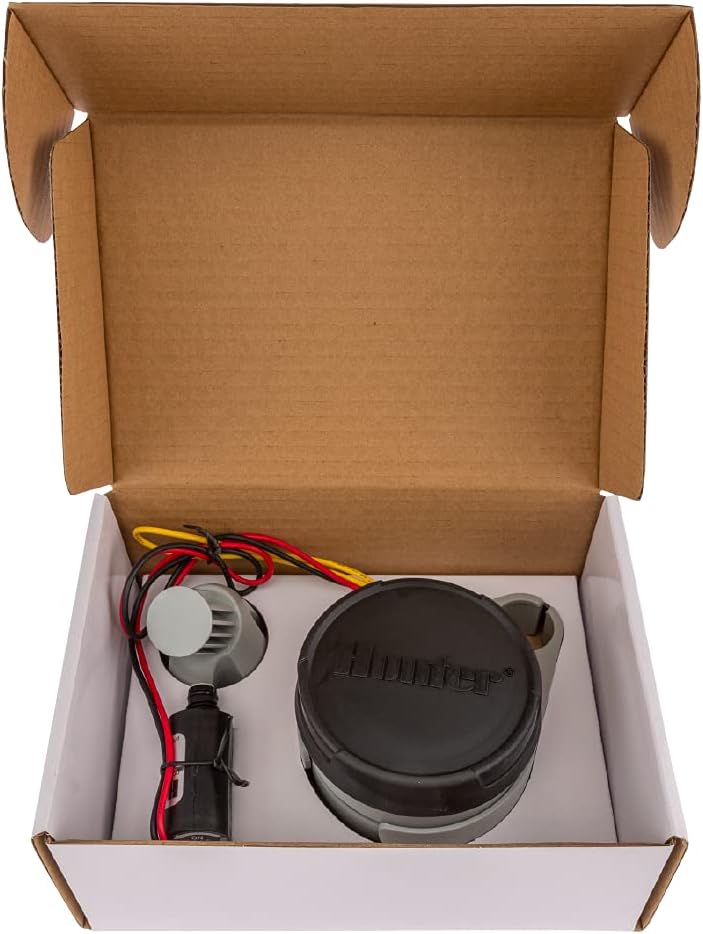
What’s in the box
Knowing what arrives in the package helps you verify you have everything needed to install right away. It also saves you time if you need to source extras in advance.
- Node 100 timer with pre-wired solenoid attached
- Mounting hardware (brackets and straps where applicable)
- Quick-start guide and user manual
- Warranty and support information
You should check the package contents immediately so you can identify missing parts before starting your install.
Installation overview
The installation is designed for quick DIY setup, and you’ll likely finish most installs in minutes. You’ll need only common tools and the required batteries.
Mounting the unit to the valve
You’ll typically mount the timer directly on top of the valve box or on the valve bonnet using the supplied hardware. If your valve bonnet is non-standard, the timer also mounts to nearby flat surfaces or a short length of PVC pipe.
Connecting the pre-wired solenoid
The Node 100 arrives with a pre-wired solenoid designed for DC-latching applications, so you’ll simply connect the solenoid to the valve and secure it. Because the solenoid is built-in, you avoid running electrical wiring back to a controller.
Battery installation and indicator
You’ll power the unit with one or two 9V batteries and watch the built-in battery-life indicator to know when replacement is needed. Installing batteries is straightforward and requires no special tools—just remove the cover, set batteries in the compartment, and replace the cover.
Detailed setup steps
You’ll appreciate a step-by-step approach to avoid common mistakes and streamline the install. These steps assume you have an in-ground valve or a valve box installation.
- Turn off any upstream water pressure or ensure safe access to the valve. You don’t need to shut off the house supply in many cases, but verify that the zone is safe to work on.
- Inspect the existing valve and confirm it uses a DC-latching solenoid or that you have a compatible solenoid. Replace the existing solenoid if it’s incompatible.
- Position the Node 100 on the valve bonnet or set it in the valve box where the pre-wired solenoid can reach. The bracket or strap should secure it without interference.
- Attach the pre-wired solenoid leads as instructed, ensuring secure connections and strain relief for wiring.
- Install a 9V battery (or two if you want redundancy) and check the battery-life indicator.
- Program your watering schedule using the intuitive buttons and interface on the Node 100.
- If you have a Rain-Clik sensor, connect it and verify that the unit recognizes the sensor response.
- Run a manual test cycle to confirm valve operation and make any runtime adjustments.
You’ll want to keep the user manual available during first-time programming to reference specific button sequences and menu options.

Scheduling and programming explained
Programming the Node 100 is targeted to be user-friendly while still offering advanced options. You’ll get flexibility for a simple lawn or a water-wise drip system.
Programs and start times
You can store up to three separate programs, each with up to four start times per day. This gives you fine control if you want different schedules for separate parts of your landscape or staggered runs to reduce water pressure impact.
Run times and long cycles
Each program can run for up to six hours, which is especially useful for deep soak cycles or long-duration drip schedules. You’ll also be able to set an interval schedule or daily watering depending on the needs of your plants.
Cycle-and-soak and seasonal adjustment
Cycle-and-soak is available to prevent runoff on slopes and compacted soil: the timer will run shorter cycles with soak intervals in between. Seasonal adjustment lets you quickly increase or decrease run durations across all programs without reprogramming every station individually.
Suspend mode for extended pause
If you need to halt watering for days or weeks—during a maintenance period or while traveling—you can use the suspend mode for up to 99 days. This is handy if you prefer to preserve settings rather than erase them.
Sensors and compatibility
You’ll be able to add sensors and use the Node 100 in sensor-controlled setups for smarter watering. Sensor compatibility helps you avoid wasting water when nature provides.
Rain-Clik and rain shut-off
This timer works with Hunter’s Rain-Clik sensor to stop watering during and shortly after rain events. If you don’t want to water when it’s wet, adding the Rain-Clik will keep your landscape from being overwatered.
Other sensors and DC-latching solenoids
The Node 100 supports DC-latching solenoids and is designed to integrate with common irrigation sensors that use compatible connections. Make sure your station solenoid is DC-latching—otherwise, you’ll need to swap to a compatible solenoid.
Waterproofing and durability
You’ll likely install this device in harsh environments, so its IP68 rating is meaningful. The Node 100 is built to tolerate wet conditions without failing.
IP68-rated protection
With an IP68 rating, the unit is protected against dust ingress and can withstand temporary submersion in water. This makes it ideal for valve boxes that can fill with water after heavy rain or for installations that are occasionally buried.
Built for year-round outdoor use
The enclosure and components are designed to resist mud, rain, and debris, so you won’t need to babysit the controller with extra tarps or boxes. If you live in an area with seasonal extremes, the Node 100 will remain dependable across changing conditions.

Power, battery life, and practical expectations
Knowing how long the timer will run between battery changes helps you plan maintenance. Battery life varies with program frequency, environmental temperature, and whether you use one or two batteries.
Battery usage considerations
A single 9V can run shorter, less frequent programs for months under normal conditions; using two 9V batteries extends that life significantly. The built-in battery-life indicator helps you see when it’s time for fresh batteries so you’re not surprised when a program fails to run.
Estimated battery life chart
This chart gives rough runtime expectations based on common patterns to help you set realistic maintenance intervals.
| Usage pattern | 1 x 9V battery | 2 x 9V batteries |
|---|---|---|
| Infrequent, short cycles (1–2 starts/day, 10–15 min each) | 6–12 months | 12–24 months |
| Moderate use (2–4 starts/day, 15–30 min each) | 3–6 months | 6–12 months |
| Heavy use (4+ starts/day, 30–60+ min each) | 1–3 months | 3–6 months |
These are estimates; actual life depends on battery brand, temperature, and program settings.
Mounting flexibility and placement tips
You’ll appreciate the multiple mounting choices because valve boxes are inconsistent across properties. The Node 100 works with common setups and offers secure installation options.
Valve bonnet mounting
Mounting on the valve bonnet is often the cleanest approach and keeps the unit right where the action is. This positioning reduces wiring lengths and keeps the solenoid connection short and neat.
Flat surface and pipe mounting
If bonnet mounting isn’t possible, you can attach the unit to a nearby flat surface or a short section of PVC pipe. Straps and brackets included in the package help secure the controller in place and prevent movement within the valve box.
In-valve box placement
Placing the controller inside the valve box keeps it protected from UV exposure and reduces tampering. Because the Node 100 is IP68-rated, you won’t need additional protective measures for most installations.
Real-world use cases
This device suits many irrigation scenarios and is especially useful when you can’t or don’t want to wire to a central controller. You’ll find it handy for specific, focused tasks.
Remote or detached lawns
When a zone is disconnected from the main control system—such as an outbuilding lawn or a separate garden—this timer offers an easy, independent solution. You’ll avoid running long trenches and wires across property.
Drip irrigation and micro-irrigation
For drip systems, the Node 100’s long run-time capability and cycle-and-soak feature help you match emitter flows with soil absorption rates. You can schedule long, slow waterings without a big electrical footprint.
Agricultural or nursery pockets
Small plots, nurseries, or specialty planting areas that need dedicated watering benefit from a stand-alone unit. Because it’s battery powered, you’ll place the controller exactly where it’s needed without tying into an electrical grid.
Troubleshooting common issues
You’ll run into occasional hiccups with any hardware; here are common problems and simple fixes that save time. These tips cover the usual suspects and quick diagnostics.
Valve does not open
Check the battery level and replace batteries if the indicator is low. Confirm the solenoid is firmly connected and compatible; if the solenoid is AC or not DC-latching, the valve won’t actuate.
Short battery life
Verify you aren’t running overly long cycles repeatedly; long run times drain batteries faster. Use high-quality 9V batteries or install two batteries for longer life, and make sure the battery compartment seals properly to protect from moisture.
Timer will not accept programming
If the interface seems unresponsive, try removing and reinserting the battery to reset the unit. Use the Easy Retrieve memory feature to restore your schedule if programming becomes corrupted.
Maintenance and seasonal care
Taking a few simple steps each season keeps the timer reliable and reduces the chance of winter damage. You’ll find routine maintenance quick and inexpensive.
- Replace batteries proactively before critical watering seasons.
- Inspect wiring and solenoid connections for corrosion or wear.
- Clean out valve boxes and remove debris that could impede operation.
- If you live in freeze-prone climates, drain water from valves and consider removing the unit for indoor storage during severe freezes to extend its life (though its rating is robust, thermal extremes still matter).
You don’t need complicated maintenance; a short check once per season often suffices.
Pros and cons summary
This balanced view helps you quickly weigh the main advantages and potential limitations before buying. It gives you talking points to compare alternatives.
Pros
- No wiring or central controller required, making installation fast.
- Battery-powered for remote or off-grid applications.
- IP68 waterproofing for robust outdoor use.
- Flexible mounting and compatibility with DC-latching solenoids.
- Advanced scheduling: multiple programs, start times, seasonal adjust, suspend mode.
- Hunter quality and Easy Retrieve memory feature.
Cons
- Limited to controlling a single valve per unit, so multi-valve zones need multiple units or a controller.
- Requires periodic battery replacement and monitoring for long-term use.
- If you have AC solenoids already installed, you may need to change them to DC-latching types.
How it compares to alternatives
You’ll want to see how it stacks up versus battery timers from other brands or running wiring to a central controller. This comparison helps you decide based on cost, convenience, and scalability.
- Compared to wired controllers: Node 100 avoids trenching and wiring costs but isn’t efficient for many valves; wired controllers are more scalable for large installs.
- Compared to other battery timers: Hunter’s IP68 rating and Easy Retrieve memory give it an edge in durability and user-friendliness.
- Compared to smart Wi-Fi controllers: Node 100 is simpler and doesn’t require connectivity; it’s better if you need local, rugged control. If you want remote app-based control, you’ll need a different device or additional smart hardware.
Buying considerations and questions to ask
Before you purchase, make sure you evaluate your system and site so you won’t need returns or extra parts. These quick checks will help you avoid surprises.
- Is your valve compatible with DC-latching solenoids? If not, can you swap the solenoid easily?
- How many valves do you need to control? Multiple valves mean multiple Node 100 units or a central controller.
- Do you have a reliable plan for battery replacement and seasonal maintenance?
- Will you use a rain sensor or other add-on sensors, and are they compatible?
Answering these will help you select the right number of units or decide whether a different solution is more cost-effective.
Final verdict and recommendation
If you need a simple, durable, and battery-powered way to automate a single valve in a remote or detached location, this unit is an excellent choice. You’ll get fast installation, robust weatherproofing, and flexible scheduling in a compact package that’s trusted by irrigation professionals.
You should buy the Hunter Node 100 if you want an easy install without wiring, need reliable outdoor performance, and want features like seasonal adjustment and sensor compatibility. If you’re planning to run many zones from one central point, consider whether a wired controller might be more economical in the long run.
Additional tips and best practices
These practical pointers will help you get the most out of your Node 100 and avoid common pitfalls. Implementing a few routines now saves headaches later.
- Keep spare 9V batteries on hand, especially before peak irrigation seasons.
- Label each Node 100 and valve if you use multiple units so you can quickly identify zones during maintenance.
- Use the cycle-and-soak feature for slopes or heavy soils to reduce runoff and increase efficiency.
- Pair with a Rain-Clik sensor to prevent unnecessary watering and conserve water.
You’ll find these small habits make system maintenance easy and extend the life of your timer.
Support and warranty
If you run into hardware issues or need help, Hunter Industries provides support for this product. You should register your product and review the warranty terms so you know coverage details and how to contact support if needed.
Closing thought
You’ll appreciate how the Hunter Node 100 simplifies valve control when you want a dependable, no-wires solution for single-zone irrigation. It’s particularly suited to off-grid, remote, or small-scale irrigation needs where reliability and waterproofing matter most.
Get The Hunter Node 100 Timer On Amazon
Disclosure: As an Amazon Associate, I earn from qualifying purchases.