
? Want to know if the VEVOR Floor Heating Mat System, 120 sqft 120V, Decoupling Membrane, Smart Thermostat & Alarm, Easy Install for Tile, Stone & Vinyl Flooring is the right choice for your next flooring project?
Buy VEVOR Floor Heating Mat System On Amazon
Product Overview
You’re looking at a full underfloor heating solution that aims to be plug-and-play for both DIYers and professionals. The VEVOR kit includes a heating mat with free-form cable, a smart programmable thermostat with GFCI protection, a floor sensor, and installation guides — everything you need to add gentle, even warmth under tile, stone, laminate, or vinyl.
This system advertises energy-efficient low-wattage heating, safety-focused design, and a monitoring function that helps prevent wasted time and materials during installation. If you prefer a low-profile, silent heating layer that won’t change your room layout or ceiling height, this product targets those priorities.
What’s included in the box
You’ll find the heating mat, thermostat, floor sensor, and documentation in the kit. Everything is designed to be compatible and ready for installation without additional components.
This is convenient because you don’t have to source separate parts or worry about compatibility between a thermostat and mat. The inclusion of a decoupling membrane and anti-crack compatibility is especially useful if you’re installing over concrete or subfloors that might shift.

VEVOR Floor Heating Mat System, 120 sqft 120V, Decoupling Membrane, Smart Thermostat & Alarm, Easy Install for Tile, Stone & Vinyl Flooring
Quick Specification Breakdown
You’ll want to glance at the main specs before committing. The table below summarizes critical numbers and features so you can quickly see if it fits your space and electrical capacity.
| Feature | Specification |
|---|---|
| Coverage | 120 sqft |
| Voltage | 120V |
| Mat Type | Free-form underfloor heating cable mat |
| Wattage | 12 W/sqft (approx. 1440 W total) |
| Thermostat | 15A programmable with GFCI protection |
| Temperature Range | 41°F–98.6°F (5°C–37°C) |
| Scheduling | 7-day scheduling, up to 4 events/day |
| Sensors | Dual-sensor monitoring (air & floor) |
| Safety Features | Dual-layer aluminum shield, grounding wire, monitoring system, alarm |
| Compatibility | Tile, natural stone, laminate, wooden floors, vinyl |
| Installation | Ultra-thin, under tile or laminate, anti-crack compatible |
| Ideal Areas | Wet or dry rooms (bathrooms, kitchens, living rooms) |
This table should help you confirm basic compatibility with your room size and electrical circuit. If your home’s breaker panel or wiring is limited, note the approximate total wattage and current draw before purchase.
First Impressions & Unboxing
You’ll notice the mat is compact and thin; it’s designed to sit under tiles or other floor coverings without creating a noticeable profile difference. The thermostat has a clear screen and a solid build, and the floor sensor cable is long enough for practical placement in most rooms.
The packaging keeps components organized, and the included guides are straightforward. If you’re new to underfloor heating, the step-by-step manual and the all-in-one kit feel reassuring — you won’t be left guessing which part to buy next.
Get The VEVOR Floor Heating Mat System On Amazon
Key Features Explained
You’ll want to understand which features matter most for your comfort, safety, and installation ease. The VEVOR system focuses on four main areas: thermostat control, flexible mat design, safety certification, and a monitoring system.
Smart Thermostat with Full Control
You get a 15A programmable thermostat with built-in GFCI that protects against ground faults. It supports 7-day scheduling with up to 4 events per day, a screen lock, and dual-sensor monitoring (air and floor), giving you precise control over temperature.
This feature matters because accurate control reduces energy waste and improves comfort. The dual-sensor setup helps the thermostat avoid overheating the floor or setting air temperature that feels different from surface temperature.
Flexible & Secure Mat Design
The mat uses free-form underfloor heating cables, which let you shape and place the heating lines where you need them. This flexibility is ideal for irregularly shaped rooms and allows integration around fixtures and cabinets.
You’ll appreciate that the cable spacing and mat design are intended for uniform heat distribution. The mat is also compatible with a wide range of floor coverings, which reduces the need for alternative solutions when you change flooring type later.
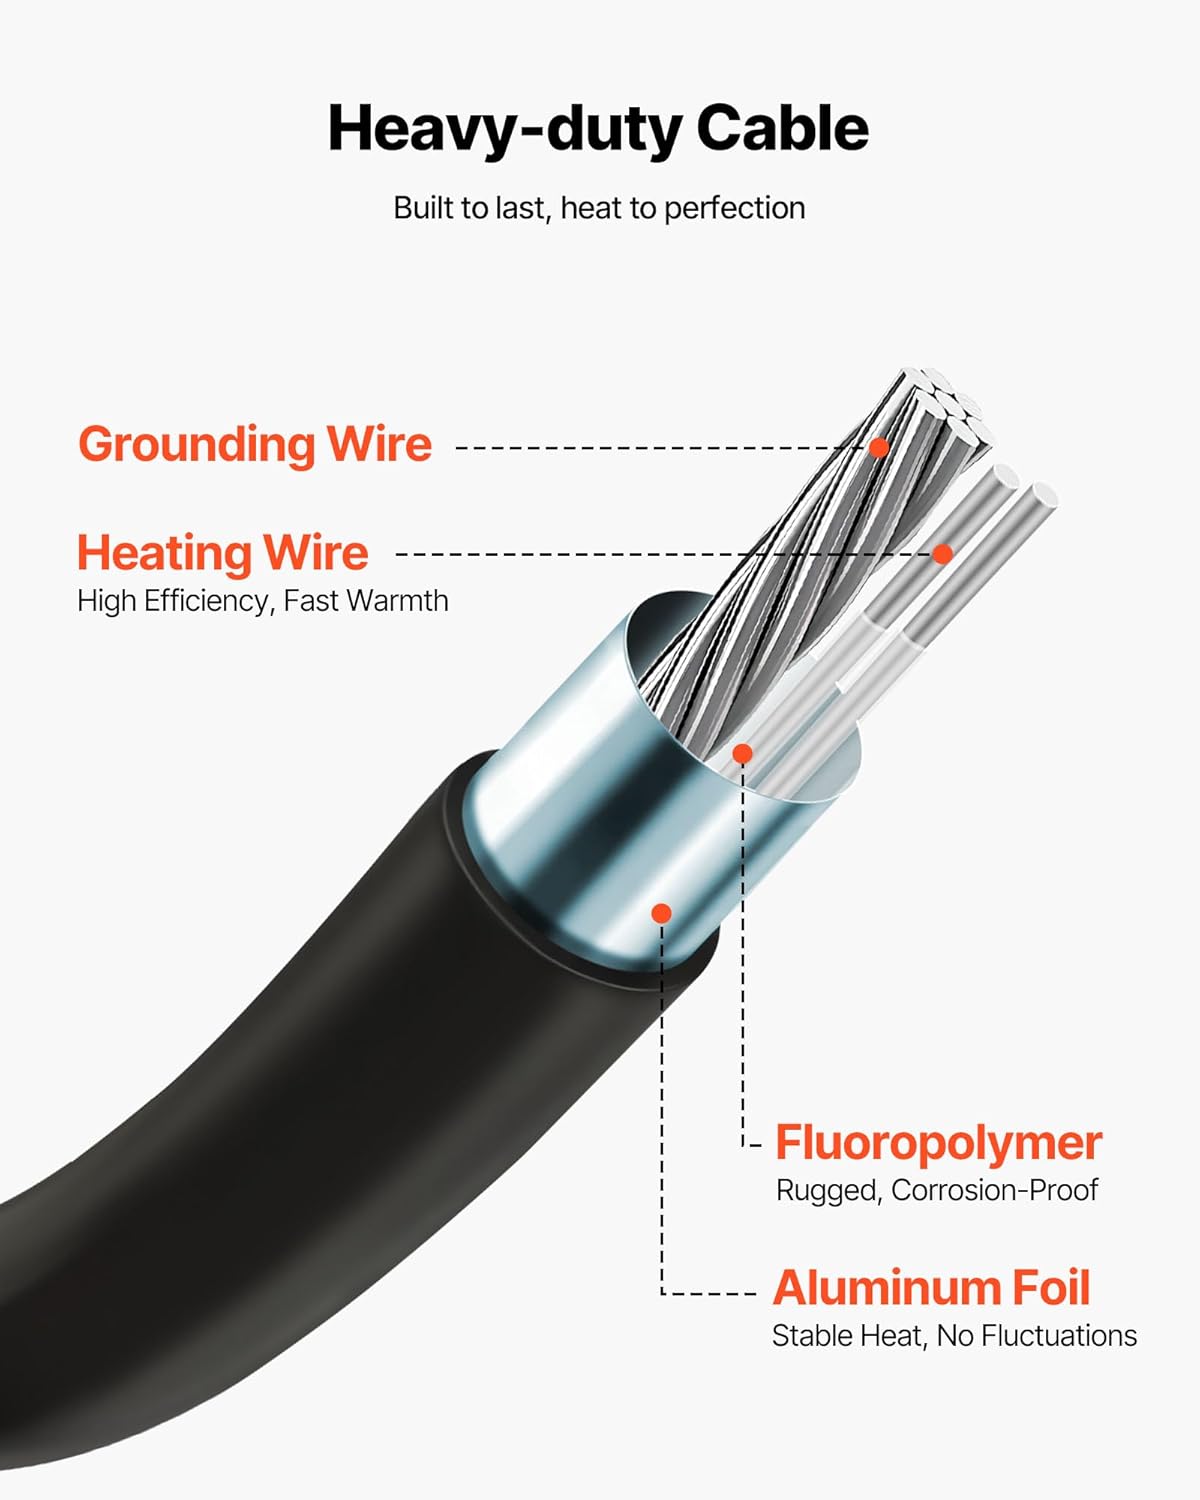
Professional Security Certification
The product features a dual-layer protection system that includes an aluminum shield to avoid signal interference and ensure even heat distribution. There’s also a grounding wire to keep operation leak-proof.
These safety elements minimize electrical interference and add a layer of protection against cable failure. The low-wattage design (12 W/sqft) reduces risk while providing sufficient radiant warmth for most applications.
Monitoring System
An installation monitor checks the underfloor heating cable functionality during installation, which can prevent later failures and the need to tear up a newly-poured floor. The system warns you if cable resistance falls outside expected ranges.
You’ll find this especially useful if you’re laying tile or pouring self-leveling compound; catching faults early saves time and money.
Ultra-Thin All-In-One Kit
The overall kit is ultra-thin and built to sit under tile or laminate with silent operation and anti-crack compatibility. The claim is that you won’t need extra parts — the thermostat, sensor, and mat are included.
This matters if you care about a minimal floor height increase and want to maintain door clearances and transitions without additional ramping.
Installation: Prep and Steps
You’ll need to prepare the subfloor carefully and follow the installation steps to ensure performance and longevity. Below are the generalized steps; always follow the manufacturer’s manual for exact instructions and local electrical codes.
Subfloor Preparation
Ensure the subfloor is clean, flat, and primed if necessary. Remove debris, nails, and loose material, and repair any structural issues before mat installation.
Your floor must be structurally sound and level because the heating mat sits directly beneath your top layer. In wet areas, ensure you follow waterproofing best practices before mat placement.
Layout Planning
Measure and plan cable placement. Keep the mat away from permanent fixtures and cabinets that don’t need heating. Plot the thermostat and sensor locations in advance.
You should also map where the mat turns and how you’ll route the power leads to the thermostat location. This saves time and reduces the chance of cutting or overlapping the cable.
Laying the Mat and Sensor
Roll out the mat and shape the free-form cable to fit your plan. Install the floor sensor in its conduit between heating runs for accurate floor temperature readings.
Make sure the cable doesn’t cross or overlap, and secure the mat as recommended. The floor sensor placement is critical for accurate thermostat control.
Electrical Hookup
The thermostat has built-in GFCI and requires connection to your 120V circuit. You may need a licensed electrician to wire the thermostat to your breaker and follow local code requirements.
Safety-first: if you’re not qualified to do house wiring, hire a pro. The thermostat’s 15A rating typically suits the 1440W load from a 120 sqft mat at 12 W/sqft, but verify compatibility with your home circuits.
Testing Before Tiling
Use the installation monitor to check the cable resistance and continuity before embedding the mat under tile or leveling compound. The monitor will flag any anomalies.
You should never trowel mortar or pour leveling compounds over an untested mat. Once covered, access becomes difficult and costly.
Final Tiling and Commissioning
After successful testing, apply thin-set or appropriate adhesive and set tiles or other floor coverings. Once cured, connect the thermostat, set schedules, and let the floor warm up gradually per manufacturer instructions.
You’ll want to program the thermostat with a conservative ramp-up to prevent thermal shock to tiles, especially natural stone.
Compatibility with Flooring Types
You’ll find the system supports tile, natural stone, laminate, vinyl, and certain wooden floors when installed properly. Each floor type has best practices you should follow for adhesion, heat transfer, and long-term performance.
For tile and stone, thin-set sits directly over the mat, providing excellent heat transfer. For laminate or engineered wood, follow the flooring manufacturer’s limits for floor temperature and use a recommended underlayment.
Tile & Natural Stone
These materials pair best with radiant underfloor heating due to high thermal conductivity. Heat transfers efficiently, yielding quick surface warmth.
You should use proper flexible thin-set and follow anti-crack membrane installation guidance where needed.
Laminate, Vinyl & Wooden Floors
You can use the mat under these surfaces, but you must check the flooring manufacturer’s maximum floor temperature limits. Some laminates and vinyl products can be sensitive to prolonged temperatures above recommended thresholds.
For wooden floors, allow for expansion gaps and monitor humidity to minimize warping over time. The thermostat’s floor sensor helps you keep surface temperatures within safe ranges.

Performance & Energy Efficiency
The mat’s low-wattage design at 12 W/sqft provides comfortable radiant heat without huge energy spikes. For a 120 sqft area, the nominal wattage is about 1440 W, which is within the thermostat’s 15A capacity.
You’ll benefit from radiant heat’s efficiency: floors warm surfaces and people directly rather than heating air indiscriminately. This can often reduce the need for higher air temperature settings on conventional heating systems.
Energy Use Example
If you run the system at full output (1440 W) for one hour, it consumes 1.44 kWh. If you run it for an average of 4 hours per day, that’s approximately 5.76 kWh/day. At an electricity rate of $0.15/kWh, this equates to roughly $0.86 per day.
These numbers are estimates and vary by your thermostat schedule, floor insulation, local climate, and electricity prices. Using the thermostat’s scheduling to heat only when you need it reduces energy consumption.
Heat Distribution and Comfort
You’ll notice even heat spread across the floor surface when the mat is installed correctly. Radiant warmth often feels more comfortable at lower air temperatures compared to forced-air systems.
Because heat originates from the floor, you’ll experience warmer feet and a cozy room sensation without blasting the entire space with hot air.
Safety Features & Certifications
Safety features include dual-layer protection with an aluminum shield, a grounding wire, GFCI protection built into the thermostat, and an installation monitoring system. These elements combine to reduce electrical risk and improve long-term reliability.
You should still adhere to local electrical codes and consider professional installation for electrical connections. The integrated GFCI reduces shock risk, and the installation monitor helps ensure cable integrity before final floor coverings are placed.
Alarm & Diagnostics
The thermostat includes alarm functionality and monitoring to alert you of faults or out-of-range conditions. This is useful for long-term protection and early detection.
When the system flags an issue, you’ll get a clear signal rather than discovering a problem days later when tiles have been set and mortar cured.
Thermostat Programming & Smart Features
The programmable thermostat supports 7-day scheduling with up to 4 events per day and a screen lock for control security. Dual-sensor monitoring balances air and floor temperatures, so you don’t overheat the surface.
You’ll use the scheduling to preheat rooms before use or maintain a steady comfortable floor temperature. The screen lock is handy if you have kids or want to avoid accidental adjustments.
Example Schedule Ideas
- Morning Warm-Up: Set the floor to reach your preferred morning temperature 30–60 minutes before waking.
- Bathroom Boost: Use a brief preheat schedule for early morning showers.
- Nighttime Economy: Lower floor temps overnight and schedule a pre-warm before waking.
Tailor schedules to your lifestyle to minimize energy use while maximizing comfort.

Troubleshooting Tips
You’ll likely have straightforward installation if you follow the guide, but a few common issues can crop up. Here are practical tips to keep things moving smoothly.
If the Thermostat Won’t Power On
Check circuit breaker and confirm wiring connections. Verify the GFCI isn’t tripped and that the thermostat is wired to the correct line voltage.
If all external checks look fine, consult the included manual or contact support before replacing components.
If You Get an Alarm or Error
Use the installation monitor to check cable resistance and continuity. If the alarm persists, disconnect power and inspect visible connections for damage.
Document readings and errors to provide support or an electrician with information for faster diagnosis.
If Floor Isn’t Heating Evenly
Confirm the mat was laid without overlap and the placement matches the layout plan. Measure the floor sensor placement; it must be between heating runs and at the correct depth.
If everything appears correct but performance lags, check adhesive coverage and ensure no thick layers are insulating the mat excessively.
Pros and Cons
You’ll want a clear list of strengths and trade-offs before deciding.
Pros
- All-in-one kit with thermostat, sensor, and mat included.
- Flexible free-form cable for custom layouts.
- Dual-sensor thermostat with GFCI and alarm for safety and precision.
- Ultra-thin design suitable under tile, stone, laminate, and vinyl.
- Monitoring system helps prevent costly installation mistakes.
- Low-wattage design helps control energy use.
These benefits make the system attractive if you value convenience, safety, and a small profile under your floors.
Cons
- Full area requires wiring capacity near the thermostat; may need electrician.
- Some flooring types require careful temperature management and manufacturer approval.
- The initial cost can be higher than baseboard or portable heating, though operating costs may be competitive over time.
- If you need large area coverage beyond 120 sqft, you’ll need additional kits or a different solution.
These cons aren’t dealbreakers for many users but are worth factoring into your plan and budget.
Comparison with Similar Products
You’ll find other brands offer underfloor heating mats with similar wattage and thermostats. What sets VEVOR apart is the all-in-one intent, built-in monitoring, and flexible cable design.
Compare based on:
- Included components (thermostat, sensor, mat)
- Safety features (GFCI, shielding, alarm)
- Support and documentation
- Price per square foot including installation materials
If you prefer a one-stop kit with built-in diagnostics and a programmable thermostat, this product aligns well. If you already have a thermostat or prefer Wi-Fi integration (not specified in this kit), check other models for connectivity options.
Who Is This For?
You’re the right candidate if you:
- Want a streamlined solution for adding radiant heat under tile, stone, or laminate.
- Prefer an all-in-one kit without searching for separate compatible parts.
- Value safety features like GFCI and built-in monitoring.
- Are comfortable with DIY installation or can hire an electrician for wiring.
If you’re installing in a very large area, require smart-home Wi-Fi integration, or have strict floor temperature limits from your flooring manufacturer, you may want to compare options.
Cost Considerations
You’ll need to account for the kit price, any additional thin-set or leveling compounds, tile materials, and possible electrician costs for wiring. Factor in long-term energy use and potential savings from efficient radiant heating.
Budget for:
- Kit cost (varies by retailer)
- Thin-set, grout, and tiling materials
- Optional decoupling membrane or waterproofing in wet areas
- Electrician labor for thermostat wiring (if you don’t do it yourself)
- Possible additional thermostat or extension cables if placement is remote
Planning for these items ahead of time keeps your project on schedule and within budget.
Maintenance and Longevity
Once installed and properly tested, the system is largely maintenance-free. The mat is beneath the finished floor, so your main upkeep is periodic thermostat checks and watching for any error alarms.
If you ever remodel or replace flooring, remember to test the mat with the installation monitor before removing anything. The embedded mat and cable are durable, but physical damage during remodeling is the main risk.
Frequently Asked Questions
You’ll likely have a few common questions before and after purchase. Here are concise answers to help you decide.
Q: Do I need a dedicated circuit?
A: Check your home’s panel. The kit draws about 1440W at full output, so a 15A circuit is typical. If other loads share the same circuit, a dedicated line may be recommended.
Q: Can I install this under existing tiles?
A: Typically no. It’s intended to be installed during a flooring project before tiles are set. Retrofitting under existing tiles usually requires removing the flooring.
Q: Is the thermostat hardwired or plug-in?
A: The thermostat is designed for hardwiring into your 120V supply and includes GFCI protection. Professional wiring is recommended if you’re not qualified.
Q: Can I use it under engineered hardwood?
A: Possibly, but verify your hardwood’s maximum floor temperature limits. Use the floor sensor and thermostat settings to prevent overheating.
Q: How long does it take to heat up?
A: Heat-up time depends on floor type and thickness. Tiles heat faster than thick wood; expect anywhere from 20 minutes to a few hours to reach setpoint depending on conditions.
Installation Checklist (Printable in Mind)
You’ll feel more secure with a checklist. Follow these steps and tick them off as you progress.
- Confirm subfloor is level and structurally sound
- Plan mat layout and thermostat location
- Test mat resistance with installation monitor before covering
- Install floor sensor in conduit between heating runs
- Secure mat and apply recommended thin-set or leveling compound
- Connect thermostat wiring per local code (hire electrician if needed)
- Program thermostat schedules and test operation
- Monitor initial operation and check for alarms
Using a checklist reduces errors and improves installation reliability.
Final Verdict
You’ll find the VEVOR Floor Heating Mat System, 120 sqft 120V, Decoupling Membrane, Smart Thermostat & Alarm, Easy Install for Tile, Stone & Vinyl Flooring to be a well-rounded kit that balances convenience, safety, and performance. The all-in-one approach, built-in GFCI thermostat with dual sensors, and installation monitoring are standout features that reduce risk and simplify the process.
If you want underfloor radiant heat for a bathroom, kitchen, or small living area and prefer a kit that includes the thermostat and diagnostics, this product is a strong contender. Just verify your circuit capacity, follow installation testing procedures, and respect flooring temperature limits for the best outcome.
If you’d like, I can help you calculate estimated operating costs for your local electricity rate, or walk you through typical wiring diagrams and thermostat programming steps specific to this model. Which would you like next?
Purchase VEVOR Floor Heating Mat System — Amazon
Disclosure: As an Amazon Associate, I earn from qualifying purchases.