
Are you trying to decide whether the Watt Stopper LMRC-213 Digital 3-Relay Room Controller On/Off/Dimming 120/277, White is the right controller for your lighting project?

Buy Watt Stopper LMRC-213 On Amazon
Product Overview
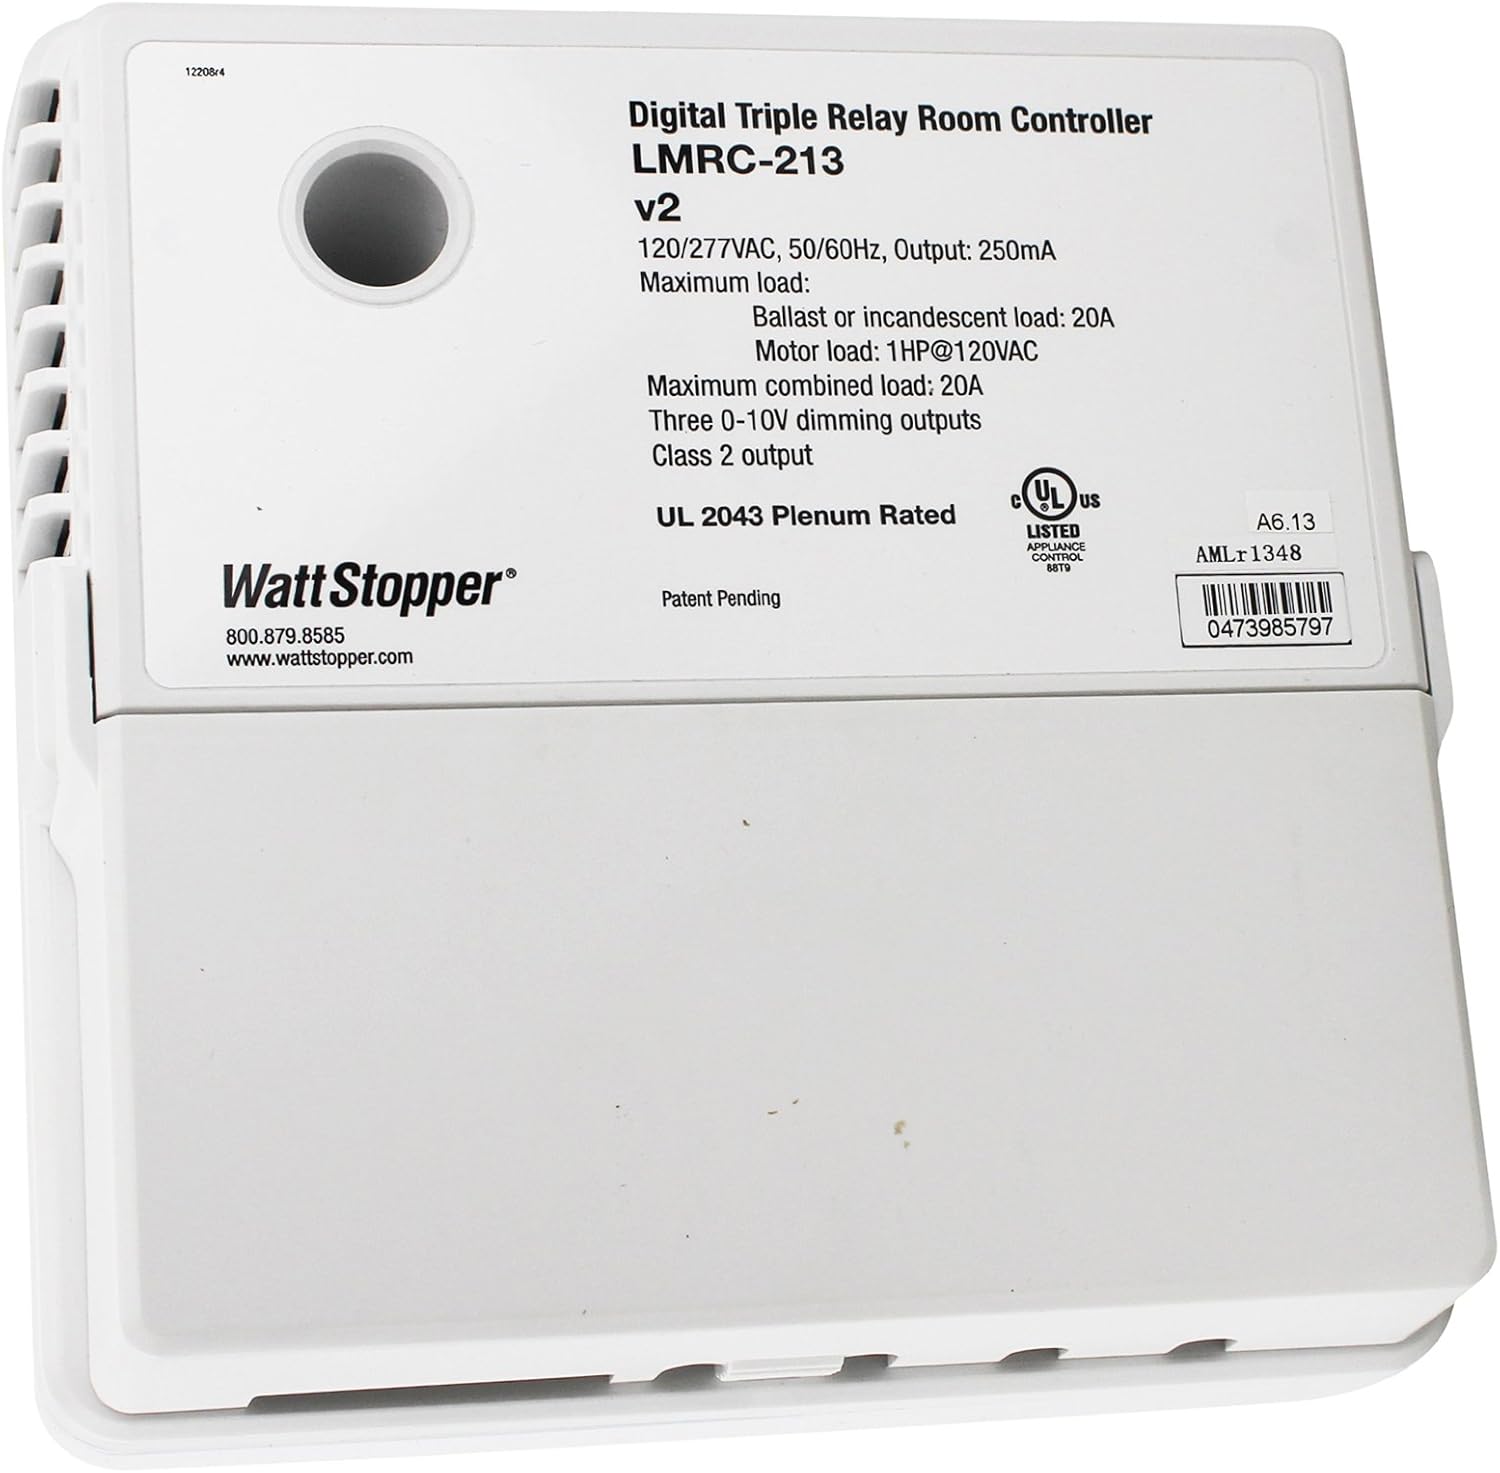
You’ll find this unit presented as a compact digital room controller designed to handle three independent relay outputs while supporting multiple control methods. The Watt Stopper LMRC-213 Digital 3-Relay Room Controller On/Off/Dimming 120/277, White is intended for commercial spaces where centralized or networked control of lighting loads is needed.
What it is
You get a digital controller that combines on/off relay switching with 0-10 volt dimming capability and RJ-45 network connectivity. The LMRC-213 is built to sit at the room level and act as the local endpoint for lighting, occupancy sensors, and a building control network.
Who it’s for
If you manage offices, classrooms, conference rooms, retail spaces, or hospitality rooms, this controller is aimed at you because it brings simple room-level control and integration into a larger building management system. You’ll especially appreciate it when you need reliable, low-profile control for mixed load types and network connectivity via RJ-45.
Watt Stopper LMRC-213 Digital 3-Relay Room Controller On/Off/Dimming 120/277, White
Key Specifications
You should check the major numbers and capabilities so you know what the LMRC-213 can handle. Below is a concise breakdown of the important specifications you’ll want to keep in mind before planning your installation.
| Feature | Details |
|---|---|
| Product Name | Watt Stopper LMRC-213 Digital 3-Relay Room Controller On/Off/Dimming 120/277, White |
| Controller Type | Digital 3-Relay Room Controller |
| Connectivity | RJ-45 (network/connectivity) |
| Control Modes | On/Off and 0-10 V Dimming |
| Line Voltage | 120/277 VAC |
| Relay Rating | 20 Amps (per relevant load/relay specification) |
| Control Voltage | 24 VDC, 250 mA |
| Color / Finish | White |
| Primary Use | Room-level lighting control and integration with BAS |
You’ll want to confirm the exact model number and any regional variations with the supplier, because electrical and compliance requirements can differ by market. Use this table as a quick reference when you compare the LMRC-213 to other room controllers or when you prepare materials for an electrician or system integrator.
Purchase The Watt Stopper LMRC-213 Room Controller
Features & Benefits
Understanding feature-to-benefit mapping will help you justify the controller’s selection to stakeholders. You’ll get a mix of local control, network integration, and flexible dimming options designed for modern building control needs.
Digital 3-Relay Control
You can control three independent circuits with separate relays, which gives you flexibility for zones or mixed load types in a single room. Each relay lets you isolate lighting banks, AV circuits, or other non-critical loads without needing separate controllers for each.
RJ-45 Connectivity
You’ll appreciate RJ-45 connectivity for straightforward network integration and the ability to connect to a building automation backbone or controller network. The physical connector simplifies wiring and often supports industry-standard signaling or specific proprietary protocols when used with compatible systems.
On/Off and 0-10V Dimming
The LMRC-213 supports both basic on/off control and smooth 0-10V dimming for fixtures that accept an analog dimming signal. That means you can manage simple switched loads as well as dimmable luminaires from the same device, giving you flexibility for retrofit and new build scenarios.
120/277V and 20 Amp Capability
Because the unit accommodates 120/277 VAC line voltages and supports loads up to 20 amps where applicable, you can use the controller on typical North American lighting circuits and larger load banks. This range fits many commercial lighting designs so you won’t need additional step-down or specialty hardware for common setups.
24VDC Control Power
You’ll find the device expects a 24 VDC control supply capable of providing 250 mA, which is standard for many controllers and sensor networks. Providing stable 24 VDC power lets you drive associated sensors and ensures the controller’s internal logic and communication maintain reliable operation.
White, Low-Profile Housing
The white finish allows the controller to blend into standard electrical enclosures or room-mounted panels, and the compact footprint makes it easy to place where you need it. You’ll find it unobtrusive in visible service closets or in-room control cabinets.
Installation
You’ll want to plan your installation so wiring, physical mounting, and integration happen smoothly. The LMRC-213’s design reflects the needs of commercial installers, but you still need to coordinate with electrical and controls trades.
Mounting and Physical Setup
You’ll typically mount the controller inside an electrical closet, backbox, or panel where line and control wiring converge. Make sure you provide enough clearance for cable access and maintain compliance with local electrical codes during installation.
Wiring and Power
You’ll wire line voltage for the relay outputs and provide a 24 VDC control supply for the logic and sensor interface. It’s important that a qualified electrician handle all line voltage connections and that you verify the 20 amp rating matches the loads you intend to control.
Location Considerations
You should place the unit where network cabling and sensor wiring can reach it without long runs that could introduce signal issues. Plan the controller location so it’s accessible for maintenance while still being protected from moisture, excessive heat, and tampering.

Wiring & Connectivity
You’ll pay attention to wiring details, since proper connections are essential for both safety and reliable operation. The LMRC-213 uses standard interfaces but you should still follow manufacturer wiring diagrams exactly.
RJ-45 Details
You’ll use the RJ-45 connector for network-level communication, and you should match the pinout and protocol expectations with the rest of your system. Confirm whether your integrator uses a specific signaling scheme over RJ-45, such as BACnet/IP, proprietary communications, or simply a physical transport for a defined control signal.
Relay Outputs
You’ll wire each relay output to the appropriate lighting circuit or controlled load, ensuring that the load type is compatible with the relay and dimming method. Check both the load current and the inrush characteristics of fixtures or ballasts, since LED drivers and other electronics sometimes present high inrush currents.
0-10V Dimming Wiring
You’ll run low-voltage 0-10V leads to dimmable ballasts or drivers and maintain polarity and separation from high-voltage wiring. Keep 0-10V control wiring as short and as free from electrical noise sources as possible to preserve stable dimming performance.
Control Power (24VDC)
You’ll supply the controller with 24VDC at up to 250 mA to power internal circuits and connected sensors. Make sure your power supply is sized to cover the controller plus any additional devices fed from the same 24VDC bus.
Programming & Configuration
You’ll configure the controller to match your room use patterns and integration requirements, and your approach depends on whether you use a local tool, a central management system, or a BAS front-end.
Commissioning Tools and Methods
You’ll likely use manufacturer-provided commissioning software or through a connected building automation system to assign relay behavior, scenes, and schedules. Verify whether configuration is done locally over a console or remotely via network so you can plan the right toolset for your integrator.
Scene and Schedule Setup
You’ll configure scenes or schedules to automate on/off and dimming behaviors for typical room scenarios like presentation mode, occupied/unoccupied, or after-hours. Make sure you test scenes under actual load conditions so the dimming performance and relay switching happen smoothly.
Sensor Integration
You’ll connect occupancy sensors, daylight sensors, and manual controls to the controller to enable automatic responses and energy savings. Confirm the wiring and logic for priority levels so manual overrides, sensors, and network commands interact predictably.

Performance & Reliability
You’ll expect robust operation in commercial environments where uptime matters. The LMRC-213 is designed for continuous use and for integrating with broader control systems, but good design and installation practices will help you achieve reliable performance.
Response Time and Control Accuracy
You’ll notice prompt relay switching and smooth 0-10V dimming transitions when the controller is installed and configured correctly. If you tune delays and fade rates, you can reduce distracting transitions and improve occupant comfort.
Thermal Handling and Load Considerations
You’ll ensure the controller is not placed in locations where ambient heat could impair performance, and you’ll respect the relay amp ratings to avoid overheating. Overloading relays or failing to account for inrush currents from LED drivers can shorten relay life, so plan circuits accordingly.
Longevity and Durability
You’ll benefit from a product intended for professional applications that typically have longer life cycles than consumer-grade equipment. Proper maintenance, correct wiring, and adherence to load limits will maximize the lifespan of the controller and minimize service calls.
Compatibility & Integration
You’ll assess how the LMRC-213 fits with your other systems so that you can make the whole building operate coherently. The controller is a component that must play well with sensors, lighting fixtures, and any central automation system.
Building Management Systems
You’ll connect the controller to a BAS via the RJ-45 port or through gateway devices depending on protocol compatibility. Make sure your BAS integrator confirms the communication scheme supported by the controller so you can exchange status, schedule changes, and diagnostics.
Sensors and Controls
You’ll integrate common occupancy and daylight sensors, as well as wall switches and control stations, to provide user-facing control and automated behavior. Confirm that sensor types and wiring match the controller’s expected inputs and that you have the right number of inputs available for your design.
Fixture Types and Drivers
You’ll pair the controller with fixtures that accept either switched line voltage or 0-10V dimming signals, and you should ensure LED drivers are compatible with analog dimming. Mismatches between drivers and the 0-10V interface can lead to flicker or limited dimming range, so verify driver specifications.
Use Cases
You’ll find the LMRC-213 useful across a range of smaller commercial rooms and spaces where you need multiple circuits and mixed control modes. Below are the typical environments where this controller shines and why it helps solve common control challenges.
Classrooms and Lecture Halls
You’ll easily manage multiple lighting banks for presentation, lecture, and ambient modes, using the three relays to separate front, back, and ambient lighting. Sensor integration and scene programming let you manage daylight harvesting and occupancy-based shutoff to lower energy consumption.
Conference Rooms and Training Areas
You’ll create scene-based control that supports AV presentations, group work, and video conferencing. Smooth 0-10V dimming helps set the correct lighting level for screens or projectors while relays control larger, non-dimmable loads.
Offices and Open Workspaces
You’ll define zones that match the furniture layout and occupant patterns so lighting can follow users for energy efficiency. Combining on/off relays and dimming signals allows you to handle legacy fixtures and modern dimmable LEDs in the same room.
Hospitality and Retail
You’ll manage focal lighting, accent lighting, and general illumination independently, delivering ambiance control and schedule-based adjustments that enhance the guest or shopper experience. The network connectivity supports centralized management for multiple rooms or zones.
Pros and Cons
You’ll want a fair assessment so you can weigh the LMRC-213’s advantages against potential limitations for your project. Below are the strengths and the trade-offs to consider during specification and installation.
Pros
You’ll enjoy flexible control with three relays plus 0-10V dimming, which reduces the need for multiple controllers in a single room. The RJ-45 connectivity and standard control voltage make integration straightforward for most building automation workflows.
You’ll also appreciate the 120/277V capability and the ability to manage moderately sized loads up to 20 amps where applicable, which covers a lot of commercial lighting scenarios. The white, unobtrusive housing makes installation visually neutral in most equipment spaces.
Cons
You’ll need to confirm compatibility with your chosen BAS protocol and possibly use gateways if the controller’s communication method differs from your system’s standard. If your lighting design includes loads with high inrush or unusual driver behavior, you may need additional specification checks or protection.
You’ll also rely on proper commissioning and good wiring practice; inexperienced installation may lead to flicker, nuisance switching, or shortened component lifetimes. Finally, if you need extensive per-fixture control or more relays per room, a higher-channel controller might be a better fit.
Troubleshooting & Common Issues
You’ll find the usual troubleshooting approaches apply if you encounter problems, and a little methodical testing often resolves most issues. Below are typical symptoms and the steps you can take to diagnose and address them.
Network and RJ-45 Problems
You’ll confirm cable continuity and correct pinout if the controller doesn’t appear on the network, and check link lights if available. Make sure the network switch or router settings don’t block necessary traffic and verify IP settings if the device uses TCP/IP.
Relay or Dimming Issues
You’ll isolate whether a problem is with the relay, the load, or the dimming circuit by testing each output with a known-good load and checking wiring polarity for 0-10V. If the relay clicks but the load doesn’t turn on, you’ll check line voltage to the relay and any fusing or breakers upstream.
Flicker and Inconsistent Dimming
You’ll inspect the 0-10V wiring for noise, long runs, or shared conduit with noisy loads, and you’ll verify LED driver compatibility with analog dimming. Adding filtering, shortening control runs, or using drivers with proven compatibility often remedies flicker.
Power and Grounding
You’ll ensure the 24VDC supply is stable and that grounding is consistent to prevent communication errors and erratic behavior. Weak or fluctuating control power is a common cause of intermittent issues, so confirm voltage under load.
Maintenance and Longevity
You’ll perform simple periodic checks to keep the controller and connected devices performing reliably over the long term. Preventive maintenance prevents many on-site failures and reduces emergency service calls.
Routine Checks
You’ll periodically verify connection tightness, inspect wiring for signs of wear or overheating, and confirm the controller operates correctly through a couple of test cycles. Regularly check network connectivity and the health of attached sensors.
Firmware and Software Updates
You’ll check with the manufacturer or distributor for firmware or configuration tool updates that may improve compatibility or add features. Applying updates during planned maintenance windows helps you avoid unexpected interruptions in service.
Replacement Parts and Serviceability
You’ll make sure replacement hardware and spare units are available for mission-critical spaces so you can minimize downtime in the event of a failure. Keeping a spare controller and a list of compatible components often reduces response time for repairs.
Safety and Compliance
You’ll make safety a priority during installation and operation, and you should always adhere to local electrical codes and standards. The LMRC-213’s ratings provide guidelines for safe use, but you must follow applicable regulations and best practices.
Electrical Safety
You’ll have a qualified electrician do all line-voltage connections, and you’ll de-energize circuits before working on the controller or connected fixtures. Proper fusing, breaker sizing, and wire gauge selection are essential to protect conductors and loads.
Environmental and Regulatory
You’ll verify environmental ratings, such as operating temperature range and enclosure requirements, so the controller isn’t exposed to conditions that could degrade performance. Also check any local or regional regulatory requirements for control devices in commercial installations.
Documentation and Labeling
You’ll label circuits, network connections, and control wiring clearly to help future maintenance and troubleshooting. Good documentation simplifies changes and reduces the risk of accidental miswiring during renovations or upgrades.
Purchasing Tips
You’ll want to ensure you purchase the right quantity and version for your project, and that you source from a reputable distributor. Consider lead times, warranty terms, and the availability of technical support when finalizing the order.
Verify Model and Specs
You’ll confirm the LMRC-213 designation and the specific electrical ratings, especially if you’re in a region with different voltage standards or code requirements. Always match the controller’s specifications to your project requirements for safety and performance.
Ask about Support and Training
You’ll inquire whether the vendor or manufacturer offers commissioning support, training, or on-call technical assistance to help your team get up and running. Having technical resources available can smooth project timelines and reduce onsite surprises.
Budget for Integration
You’ll account for the cost of associated sensors, cabling, gateways, and commissioning labor in your budget, because the controller is typically one piece of a larger control solution. Underestimating integration effort is a common source of project delays and increased costs.
Final Verdict
You’ll find the Watt Stopper LMRC-213 Digital 3-Relay Room Controller On/Off/Dimming 120/277, White is a practical, flexible option for room-level lighting control in commercial settings. It provides a solid mix of relay control, 0-10V dimming, and RJ-45 connectivity, making it suitable for many applications when correctly specified and installed.
You’ll want to validate compatibility with your lighting drivers and BAS protocol, ensure appropriate load planning, and use qualified installers to get the most from the controller. If your rooms need three circuits of control, mixed on/off and dimming capability, and network integration at the room level, the LMRC-213 is certainly worth evaluating for your project.
Get The Watt Stopper LMRC-213 Now On Amazon
Disclosure: As an Amazon Associate, I earn from qualifying purchases.