
Thinking about a simple, all-in-one smart home kit that you can actually get running in minutes?

Buy YoLink Smart Home Starter Kit On Amazon
What you’re looking at: Product overview
You have the YoLink Smart Home Starter Kit: Smart Plug Mini, Siren Alarm, Water Leak Sensor, Motion Sensor, Temperature/Humidity Sensor, 2 Door/Window Sensors & Hub in front of you. This kit is designed to give you a multi-sensor foundation for home monitoring and basic automation, with a single Hub that handles Internet connectivity for all included devices.
You’ll appreciate that the kit emphasizes straightforward setup: plug the Hub into power and your router, scan in devices, and start using the system quickly. Note that the Hub is the only device that connects to the Internet, and it requires either a wired or WiFi connection — wired is recommended for the easiest, fastest plug-and-play experience and for the most reliable and secure connection. If you choose WiFi, setup difficulty varies and may require adjusting network settings on your router and phone, and any future network changes will require app updates.
Quick summary of what this kit gives you
You’ll get a hub plus seven sensor/action devices that cover power control, audible alarm, water leaks, motion, temperature/humidity, and two contact sensors for doors/windows. This lets you monitor environmental hazards, secure entry points, and automate lights or other outlets based on motion or schedules.
You’ll also get the convenience of a central hub that reduces the number of devices on your home network, while providing a single app for notifications and automations.
YoLink Smart Home Starter Kit: Smart Plug Mini, Siren Alarm, Water Leak Sensor, Motion Sensor, Temperature/Humidity Sensor, 2 Door/Window Sensors & Hub
What’s in the box
You’ll find the Hub, one Smart Plug Mini, one Siren Alarm, one Water Leak Sensor, one Motion Sensor, one Temperature/Humidity Sensor, two Door/Window Sensors, and the necessary power adapters and mounting accessories. Each device usually includes quick-start guides and often batteries where required.
You should confirm the included mounting tape, screws, and any battery sizes before starting setup, so you aren’t interrupted during installation.
Hub hardware and ports
You’ll see a compact Hub with a power plug and an Ethernet port on the back. The Hub plugs into an outlet and then into your router for wired setup, but it can also be configured to connect via WiFi if you prefer.
Keep in mind that wired connection is recommended for the most reliable experience, while WiFi can be more finicky and may require you to change network/passcode settings in the app.
Device form factors
Each sensor is designed for easy placement: the Smart Plug Mini fits into an outlet for controlling lamps or small appliances, the door/window sensors are two-piece contacts for entry points, the motion sensor is a small battery-powered unit for rooms and hallways, the water sensor is a flat pad that you place near potential leaks, the temperature/humidity sensor is compact and unobtrusive, and the siren alarm can be wall-mounted or placed on a shelf.
You’ll find the compact sizes useful when you want sensors to be discreet, and most provide simple mounting options to get you started quickly.
Table: Device breakdown at a glance
You’ll find this table useful for comparing the included devices and their primary uses. It’s a quick reference for installation priority and expected functions.
| Device | Primary Function | Typical Power | Placement | Typical Use |
|---|---|---|---|---|
| Hub | Connects devices to Internet, manages network | Plug-in (requires power) + Ethernet/WiFi | Near router or central outlet | Central communication and cloud connectivity |
| Smart Plug Mini | On/off control, schedules, remote control | Plug-in | Any outlet | Automate lamps, small appliances |
| Siren Alarm | Audible alarm for alerts | Plug-in or battery (check included) | Near entrance or central room | Intrusion alerts or alarm announcements |
| Water Leak Sensor | Detects water presence | Battery | Under sinks, near water heaters | Leak and flood detection |
| Motion Sensor | Motion detection | Battery | Hallways, rooms, entry points | Presence-triggered automations |
| Temp/Humidity Sensor | Measures temperature and humidity | Battery | Living areas, basements | Environmental monitoring, HVAC control |
| Door/Window Sensors (x2) | Contact detection for doors/windows | Battery | Doors/windows, cabinets | Entry detection, automations |
You’ll notice the table focuses on core functions and placement ideas to help you plan where to install each sensor for the best coverage.
Purchase The YoLink Smart Home Starter Kit
Setting up the system: Plug, Plug & Play!
You’ll follow a simple flow: plug the Hub into an outlet, connect it to your router (or set up WiFi), open the YoLink app, scan in new devices, and your system should be ready in minutes. The promise here is plug-and-play convenience, with the Hub serving as the gateway for all sensors.
You should plan for a few minutes per device if you want to mount them properly and test triggers and notifications after installation.
Hub connection: wired vs WiFi
You’ll get the most reliable experience by plugging the Hub into your router with Ethernet. Wired connection is described as “required for easy & fast Plug, Plug & Play, and most reliable and secure connection.” WiFi is possible, but setup difficulty varies and might require you to change network settings and phone permissions.
If your router is not near a convenient outlet, consider using a short ethernet run or a powerline adapter. If you choose WiFi, be prepared to temporarily change your phone’s WiFi settings during setup and to revisit app settings if your network changes.
Scanning devices into the app
You’ll open the app, create an account if required, and add devices by scanning QR codes or following device-specific pairing steps. The Hub is the only device that communicates with the Internet, so pairing goes through the Hub rather than each device individually connecting to your home WiFi.
You’ll want to test each device after pairing and assign useful names and locations in the app so notifications are meaningful.
The YoLink Hub: the brains of the system
You’ll rely on the Hub for device coordination, cloud connectivity, automations, and remote access. The Hub keeps your sensors off your WiFi and centralizes control in the YoLink app.
You should make sure the Hub is placed where it can communicate well with the sensors while still being able to reach your router. A central location with clear line-of-sight to sensors will often give you the best performance.
One Internet connection point
You’ll appreciate that only the Hub connects to the Internet, which reduces the number of devices that need WiFi credentials and can simplify network security. That design also means any change to your network (SSID, passcodes, router) will require updating settings in the app.
You’ll want to back up your account credentials and keep track of network changes to avoid losing remote access or outgoing notifications.
Performance and reliability expectations
You’ll typically see better battery life on sensors when using a single hub design because devices can use low-power radio profiles. The wired Hub provides stable Internet connectivity for cloud-based rules and notifications.
You should also check for firmware updates after setup; these can improve stability and add features over time.
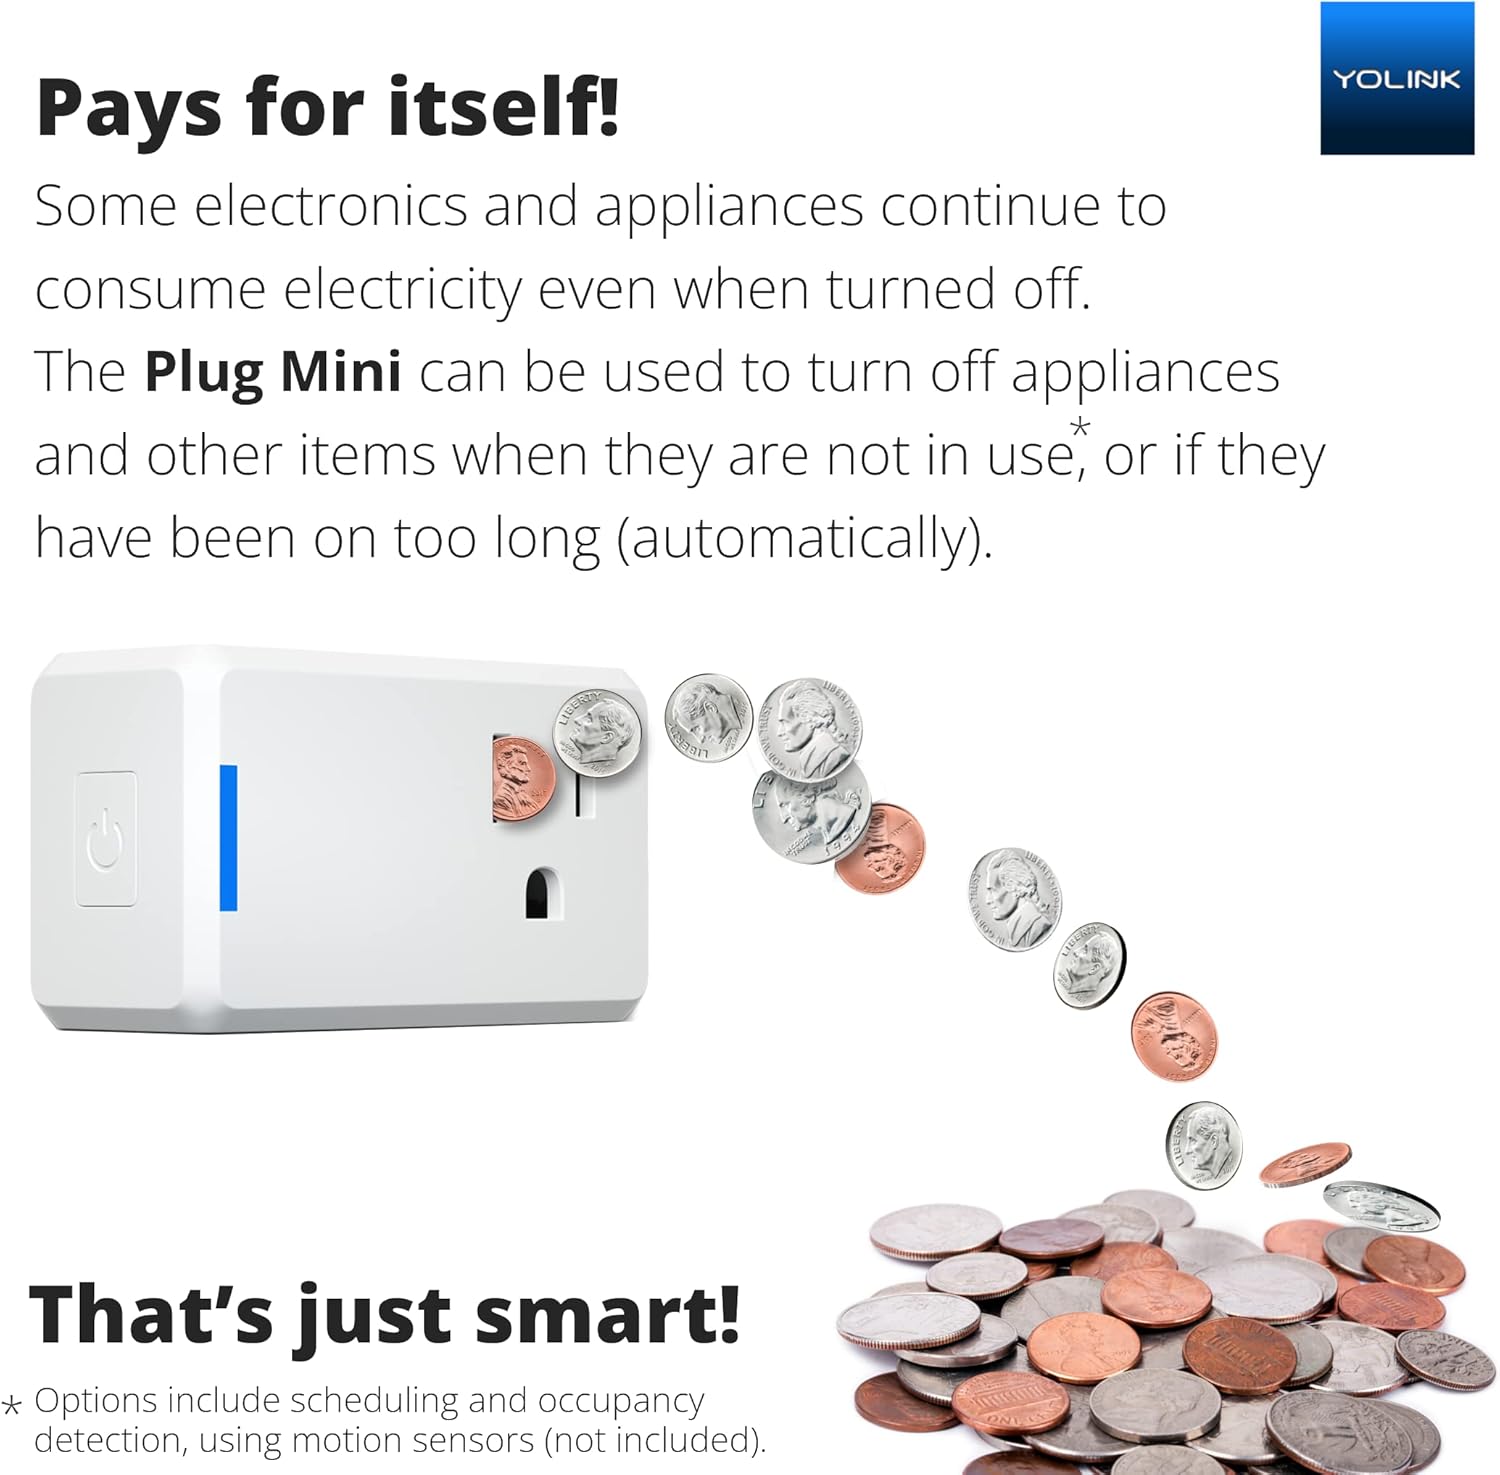
Smart Plug Mini: what it does and how it performs
You’ll use the Smart Plug Mini to turn lamps, fans, and other small appliances on and off, set schedules, or include the outlet in automations. It’s an easy way to automate a device that wasn’t smart before.
You’ll want to avoid high-draw appliances like space heaters; use the plug for lights, chargers, and small electronics within the manufacturer’s rated power limits.
Installation and day-to-day use
You’ll plug it into an outlet, add it to the app via the Hub, and then control it from your phone or automate it based on time or other sensor triggers. The app typically allows you to create schedules, timers, and scenes.
You’ll likely find the physical footprint small enough to avoid blocking adjacent outlets — check your specific wall plate layout before buying multiples.
Tips and limitations
You’ll want to name the plug clearly (e.g., “Living Room Lamp”) so automations make sense. Also confirm the plug’s maximum current rating before connecting anything that draws a lot of power.
You’ll find it useful for energy savings and convenience, but it won’t replace heavy-duty smart switches for in-wall installation.

Siren Alarm: attention getter and deterrent
You’ll have a siren that can sound when sensors trigger, giving you an audible deterrent for intrusions or warning you to issues like water leaks. It’s a straightforward way to get attention quickly.
You’ll probably want to place it where it can be heard throughout the house but still be accessible for testing or silencing.
Sound levels and use cases
You’ll find that sirens in starter kits are designed to be loud enough to alert occupants and scare off intruders, but you should check mapped decibel levels in the product documentation if you need exact figures. It’s great for entry alerts and alarm scenarios tied to the door/window sensors or motion detector.
You’ll also want to consider neighbors and your building rules if you live in apartments, since an alarm can be intrusive.
Integration with other sensors
You’ll set the siren to trigger on specific events, such as door opening while the system is armed, motion detected at night, or a water sensor alert. The Hub lets you configure those associations in the app.
You’ll test each trigger to make sure false alarms are minimized and thresholds are comfortable for your household.
Water Leak Sensor: protect floors and basements
You’ll place this sensor near water heaters, under sinks, behind appliances, or in basements to get immediate alerts if water is detected. Early detection can save you a lot on repairs and cleanup.
You’ll want to test it with a small amount of water before final placement so you know how the app will notify you and which automations will run.
Placement and sensitivity
You’ll orient the sensor flat on the floor or area where leaks first appear; some users place multiple sensors near common leak points for redundancy. The device is usually simple—when water touches the probe area, it sends an alert through the Hub.
You’ll confirm the battery level and the contact area is unobstructed so water reaches the sensor quickly when a leak occurs.
Automations tied to leaks
You’ll automate actions like turning off a smart plug powering a pump or sending push notifications and emails to contacts. With the Hub as the single Internet point, these automations are triggered locally via the Hub and then forwarded to the cloud if you need remote alerts.
You’ll test the full alarm chain—sensor trigger, siren, and phone notification—to ensure you receive the alert instantly.
Motion Sensor: presence detection and automation
You’ll use the motion sensor for security triggers or convenient automations like turning lights on when you enter a room. It works well in hallways, entryways, and rooms where motion indicates presence.
You’ll adjust placement to avoid direct sunlight or heating vents that can cause false positives.
Sensitivity and placement tips
You’ll mount the sensor at a height that gives a good view of the area (commonly 6–7 feet high) and angle it to catch walking paths. Avoid pointing it at HVAC vents or windows where shifting heat or sunlight can trigger false alarms.
You’ll test detection range and blind spots, as corners and furniture can cause missed detections or create false triggers.
Use with automations
You’ll pair motion triggers with smart plugs, lights, or scenes so devices react automatically. For example, motion at night could turn on low-level lighting, or motion while away could trigger the siren and send alerts.
You’ll create hold-off settings if available to prevent repeated triggers in busy areas.

Temperature/Humidity Sensor: environmental awareness
You’ll monitor room temperature and humidity to protect sensitive items or to optimize HVAC usage. This sensor is helpful in basements, attics, nursery rooms, or wine storage areas.
You’ll use the app to log trends, set thresholds, and create automations like turning on a dehumidifier or sending a warning if humidity exceeds a chosen level.
Accuracy and placement
You’ll place the sensor out of direct sunlight and away from heating/cooling vents for accurate readings. Wall mount or shelf placement at chest height often gives more representative indoor conditions.
You’ll periodically verify readings against a calibrated thermometer/hygrometer if you’re using the data for delicate applications.
Automation ideas
You’ll automate HVAC triggers, fan control, or humidifier/dehumidifier schedules using this sensor’s data. You can also combine temperature rules with time-based schedules to save energy.
You’ll test thresholds and hysteresis to avoid rapid on/off cycles for connected devices.
Door/Window Sensors: entry point monitoring
You’ll mount these two-piece sensors on doors or windows to get immediate alerts when they open or close. They’re your basic line of defense and the foundation for many automations.
You’ll make sure the magnetic and sensor pieces line up properly and that adhesive or screws are secure for long-term performance.
Installation and alignment
You’ll align the two parts within the recommended gap (usually under 1/2 inch) and mount them on the door frame and the door. Test the open/close action in the app to verify consistent reporting.
You’ll also name them clearly (e.g., “Front Door”) so notifications are unambiguous.
Use with security and convenience features
You’ll pair door sensors with the siren or set them to turn on lights when someone enters at night. They’re also great for automating HVAC setbacks when windows are left open.
You’ll set up entry delays if you need a grace period when opening the main door to prevent false alarms.
App experience: control and automations
You’ll interact with the YoLink app (or the service layer that YoLink uses) for setup, daily control, automations, and notifications. The app centralizes status for all devices connected to the Hub.
You’ll want to spend a bit of time organizing devices by room and creating meaningful automations so the system behaves predictably.
Notifications and alerts
You’ll receive push notifications, and possibly emails, for triggered events like leaks, motion while away, or door openings. Because the Hub is the Internet gateway, notifications depend on the Hub’s connection to your network.
You’ll test and customize notification preferences so only important alerts reach you during the day, and critical alerts always wake you up at night.
Automations, scenes, and scheduling
You’ll build automations that link sensors to actions (for example, if water detected then siren and push notification). The app typically supports scheduling, conditional rules, and possibly multi-device scenes.
You’ll make use of simple, reliable rules rather than overly complex automations that are harder to debug later.
Integration and voice assistants
You’ll often want voice control and integration with broader home ecosystems. YoLink products commonly support integrations like Alexa and Google Assistant, but you should confirm current compatibilities in the product documentation or app.
You’ll test voice commands after setup to ensure responsive control and that device names are easy for the assistant to understand.
Third-party integrations
You’ll check if the Hub supports IFTTT or other third-party services if you want advanced automations that go beyond what the app provides. Integration capabilities can expand the usefulness of each sensor.
You’ll also consider whether you need integrations for home automation hubs like Home Assistant, and verify support or community-developed connectors.
Local vs cloud processing
You’ll be glad that the Hub reduces the number of cloud connections from devices, but many automations and remote notifications still rely on cloud services. Check what automations run locally on the Hub versus those that need the cloud for faster and more private responses.
You’ll plan critical automations (like local sirens) to function locally so they remain operational if the Internet goes down.
Range, reliability, and battery life
You’ll want to know how far sensors reach from the Hub and how long batteries last. YoLink products typically use a sub-GHz radio that offers longer range and better penetration than WiFi, but check spec sheets for claimed distances and expected battery life.
You’ll test sensors in the actual areas where you plan to install them; walls, metal studs, and appliances can reduce range.
Expected battery performance
You’ll usually see multi-month to multi-year battery life depending on sensor type and reporting frequency. Motion sensors tend to consume more power when triggered frequently, while contact sensors and temperature sensors often last longer.
You’ll monitor battery levels in the app and plan replacement intervals, especially before seasons when you rely on the system more heavily.
Reliability tips
You’ll place the Hub centrally and avoid large metal obstructions between it and sensors. If you live in a larger home, you might need an additional Hub or range extenders (check product support) to cover all areas.
You’ll regularly check the app for device connectivity and address low-signal warnings promptly.
Security and privacy considerations
You’ll want to protect your account and home network: use strong account passwords, enable two-factor authentication if available, and keep the Hub firmware up to date. Only the Hub connects to the Internet, which reduces exposure for individual sensors.
You’ll also be mindful that any cloud-based notifications or integrations will involve some data passing through external servers.
Network changes and account updates
You’ll remember that changes to your network SSID or passcodes require you to update the Hub and possibly the app settings. This single-point Internet connection simplifies updates but makes them necessary whenever your home network changes.
You’ll store your account credentials securely and keep recovery options current to avoid lockout.
Data handling and privacy
You’ll check the company’s privacy policy to understand what data is collected, stored, and shared. Some users prefer local-first systems for greater privacy; with YoLink, many operations are local to the Hub, but cloud components may still be involved.
You’ll weigh convenience of remote access against your preferences for data handling.
Practical, real-world use cases
You’ll use this kit for entry-level home security, leak detection, presence-based lighting, and environmental monitoring. It’s a good starting point if you want a single system that covers multiple common needs.
You’ll find it particularly useful in rental properties, small homes, and for monitoring specific risk points like basements or water heaters.
Example automation scenarios
You’ll create a routine where motion between dusk and dawn turns on a porch lamp via the Smart Plug Mini. You’ll set the water sensor to trigger a siren and push notification if a leak is detected. You’ll get a temperature alert if your basement drops below freezing to prevent frozen pipes.
You’ll plan these automations gradually so you can measure usefulness and avoid notification fatigue.
Ideal households for this kit
You’ll benefit from this kit if you want a quick, unified sensor package for basic security and environmental alerts. It’s also attractive if you value a single Hub for network simplicity and ease of management.
You’ll find it less suited if you need enterprise-grade monitoring, professional alarm company integration, or in-wall smart switches for full lighting control.
Troubleshooting tips
You’ll run into few hiccups if you follow best practices: keep the Hub firmware updated, place the Hub centrally, and check WiFi settings if pairing fails. If a device won’t pair, power-cycle the Hub and the device, and ensure batteries are fresh and oriented correctly.
You’ll consult the app support section and YoLink help resources for device-specific troubleshooting steps.
Common fixes
You’ll resolve connectivity issues by moving the Hub closer temporarily during setup, checking router firewalls, and ensuring the Hub has a stable wired or strong WiFi connection. Rebooting the router and Hub can clear transient issues.
You’ll also re-add devices after resolving network changes to ensure clean connections.
When to contact support
You’ll reach out to YoLink support if a device repeatedly drops offline, refuses to pair after multiple attempts, or if firmware updates fail. Provide logs and device names to speed up diagnosis.
You’ll keep receipts and serial numbers handy for warranty or replacement requests.
Pros and cons
You’ll find this section helpful for a quick decision: here are real strengths and potential limitations.
You’ll use these points to decide if the kit fits your expectations and home environment.
Pros
- You’ll get a complete set of sensors that cover common monitoring needs out of the box.
- You’ll enjoy a single Hub that reduces the number of devices that need WiFi credentials.
- You’ll appreciate the quick plug-and-play wired setup option for the most reliable connection.
- You’ll benefit from straightforward automations and push notifications for urgent events.
You’ll also like the small form factors and practical mounting accessories included in many kits.
Cons
- You’ll need to update network and app settings when your router or passcodes change.
- You’ll face potentially complex WiFi setup if you can’t use a wired Ethernet connection to the Hub.
- You’ll be limited by the kit’s included devices if you need advanced security features or additional coverage.
- You’ll want to verify integrations with third-party platforms if you have a broader smart home ecosystem.
You’ll also consider that siren volume, exact battery life, and range may vary with real-world conditions.
Final tips before you buy and install
You’ll map out where sensors will go, ensure the Hub can reach the router (or plan a wired run), and think about how you’ll handle notifications. Pre-testing devices and planning automations will save time and reduce frustration.
You’ll also keep track of spare batteries and check whether future expansion is easy—confirm if additional YoLink sensors and plugs are compatible.
Long-term maintenance
You’ll check the app periodically for firmware updates and battery levels, and you’ll test alarm scenarios occasionally so you know the whole system functions when you need it. Keep your account credentials up to date and use safe password practices.
You’ll also document your automations so you can tweak them later as your needs change.
Final verdict
You’ll find the YoLink Smart Home Starter Kit: Smart Plug Mini, Siren Alarm, Water Leak Sensor, Motion Sensor, Temperature/Humidity Sensor, 2 Door/Window Sensors & Hub to be a practical and approachable starter solution. It provides a solid mix of sensors and a central Hub that simplifies Internet access for your devices.
You’ll be pleased if you want a ready-made set that gets you meaningful coverage quickly, but you’ll also want to make sure you’re comfortable managing hub-based WiFi settings and occasional network updates. With reasonable placement and a wired Hub connection when possible, this kit can serve reliably for basic home monitoring and automation needs.
Get The YoLink Smart Home Starter Kit Now
Disclosure: As an Amazon Associate, I earn from qualifying purchases.